> For the complete documentation index, see [llms.txt](https://helpdesk.smaply.app/llms.txt). Markdown versions of documentation pages are available by appending `.md` to page URLs; this page is available as [Markdown](https://helpdesk.smaply.app/account-and-team/customization/how-to-set-up-custom-branding.md).

# How to set up custom branding

Add your logo, account icon, and a set of brand colors once, and they carry through to your PDF exports, your shared maps, and every color picker in the platform. Branding lives on the **Account** tab of **Account settings**, not the **Customization** tab.

{% hint style="info" icon="tag" %}

#### Plan availability

Custom branding is available on the **Governance** plan.
{% endhint %}

{% hint style="warning" icon="list-check" %}

#### Prerequisites

You need an Admin role at the account level. Branding is set once for the whole account.
{% endhint %}

{% hint style="info" icon="clipboard-list" %}

#### In this guide

1. [Set your logo](#set-your-logo)
2. [Set your account icon](#set-your-account-icon)
3. [Manage your brand colors](#manage-your-brand-colors)
4. [Where your branding appears](#where-your-branding-appears)
   {% endhint %}

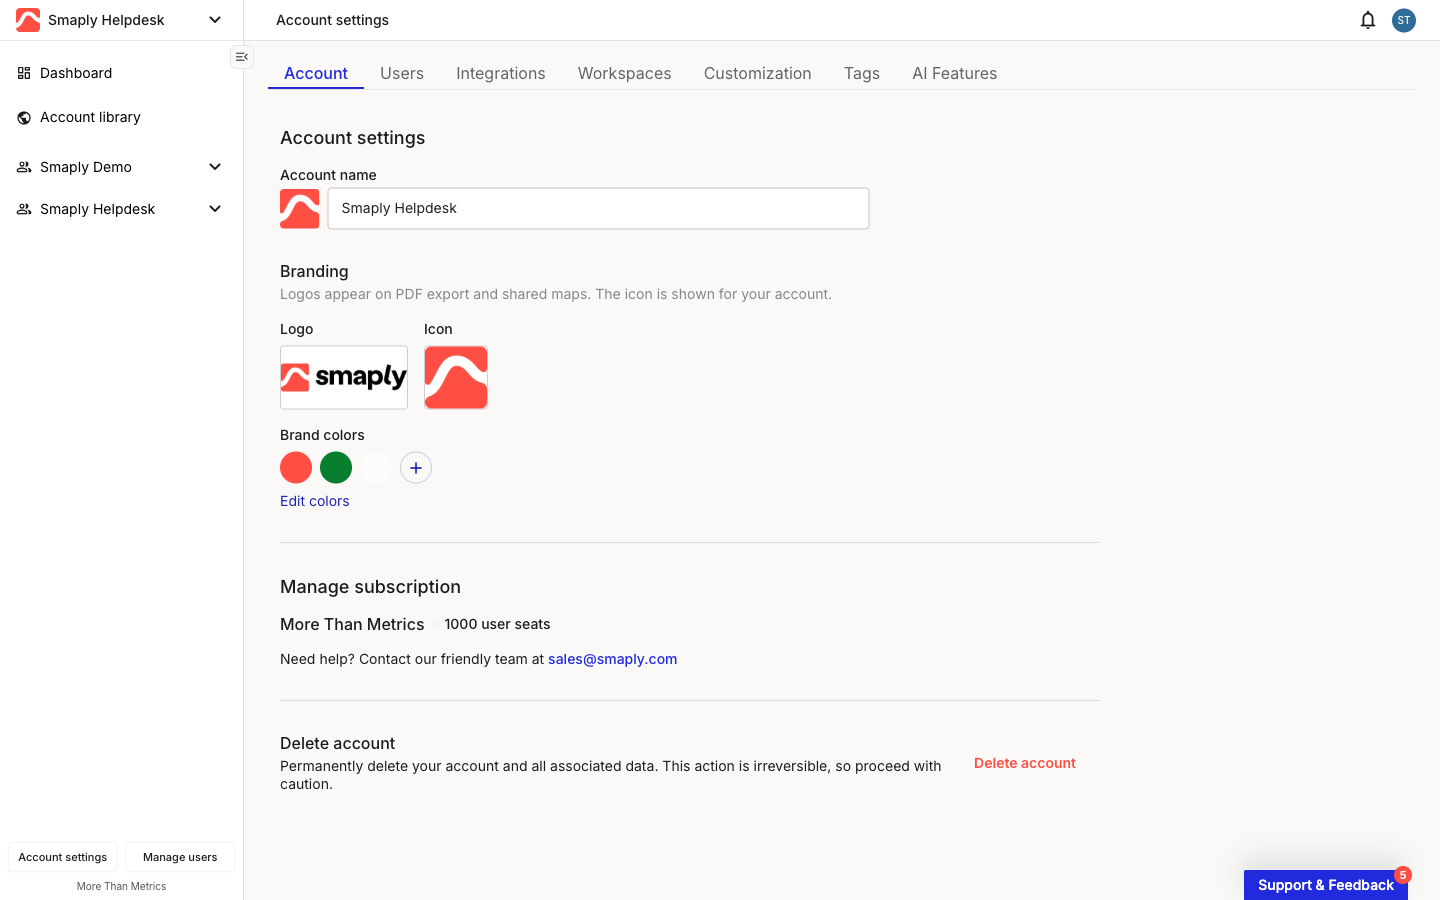
To open the settings, click your account name at the top of the left sidebar, go to **Account settings**, and open the **Account** tab. The **Branding** section sits below the account name.

<figure><img src="/files/5SC9DmouyhYc0rtKOU7B" alt="The Account tab of Account settings. The Branding section shows a Logo upload, an Icon upload, and a row of brand color swatches with a plus button and an Edit colors link."><figcaption><p>Account settings > Account, Branding section</p></figcaption></figure>

#### Set your logo

The logo is a wider-format image that appears on your PDF exports and shared maps.

In the **Branding** section, hover over the **Logo** thumbnail and click the edit control, then choose your image. Standard image file formats are accepted. The same hover reveals a delete control if you want to remove the current logo.

#### Set your account icon

The icon is a square image used as your account avatar throughout the platform, including in navigation.

Hover over the **Icon** thumbnail next to the logo, click the edit control, and choose a square image. As with the logo, standard image file formats are accepted, and the hover menu includes a delete control.

#### Manage your brand colors

Brand colors are account-level defaults that become available in every color picker across the platform, so your team can apply on-brand colors to maps, stages, and cards without re-entering hex values each time. You can save up to 14.

{% stepper %}
{% step %}
**Open the brand colors editor**

Under **Brand colors**, click **Edit colors** (or the **+** button next to the swatches). The **Edit brand colors** dialog lists your current colors, each with its hex value and a delete control.

<figure><img src="/files/jdzk0igvWqPaWjPcrTim" alt="The Edit brand colors dialog. Each saved color is a row with a swatch, its hex value, and a delete icon, with an Add brand color link at the bottom."><figcaption><p>Edit brand colors</p></figcaption></figure>
{% endstep %}

{% step %}
**Add a color**

Click **Add brand color**. A color picker opens with a shade square, a hue slider, and a **Hex** field. Pick a color or type a hex value, then click **Save** to add it to your palette.

<figure><img src="/files/9sNMIVwnrLjSJ2ADXSFt" alt="The brand color picker open from the Edit brand colors dialog, showing a shade square, a hue slider, a Hex input field, and a Save button."><figcaption><p>Add brand color, with Hex input</p></figcaption></figure>
{% endstep %}

{% step %}
**Remove a color**

Click the delete icon on a color's row to take it out of the palette. Maps, stages, and cards already styled with that color keep it. The color is just no longer offered in the picker for new selections.
{% endstep %}
{% endstepper %}

Your brand colors now appear in a **Brand colors** section in the color picker wherever you style content, below the standard colors.

***

#### Where your branding appears

Once set, your branding carries into the outputs your stakeholders see:

* **Logo** - Appears on PDF exports of journey maps and on maps you share through a read-only HTML link.
* **Icon** - Used as your account avatar across the platform.
* **Brand colors** - Available in every color picker for styling maps, stages, and cards.

Custom branding adds your logo and colors to these outputs. It does not remove Smaply's own branding. If you need a full white-label setup, contact support at <code class="expression">space.vars.supportEmail</code>.

For the export and sharing flows themselves, see the articles below.

#### Related topics

<table data-column-title-hidden data-view="cards"><thead><tr><th>Article</th><th>What it covers</th><th data-hidden data-card-target data-type="content-ref">Target</th></tr></thead><tbody><tr><td><strong>How to export a journey map as PDF</strong></td><td>Export options, page size, and what's included, with your branding applied.</td><td><a href="/pages/bFw8ZAfXKB40zpzNx0GL">/pages/bFw8ZAfXKB40zpzNx0GL</a></td></tr><tr><td><strong>How to share a journey map via HTML link</strong></td><td>Create a read-only public link and set what viewers can see.</td><td><a href="/pages/pIllWy9tostqqZvqoymz">/pages/pIllWy9tostqqZvqoymz</a></td></tr><tr><td><strong>How to use icon templates</strong></td><td>Build reusable icon sets for Icon cards on journey maps.</td><td><a href="/pages/slsfRG28ukTuwANdbWJw">/pages/slsfRG28ukTuwANdbWJw</a></td></tr><tr><td><strong>How to create and use templates</strong></td><td>Save a journey map as a reusable starting point.</td><td><a href="/pages/LY87TNBIxycYQoy5aUly">/pages/LY87TNBIxycYQoy5aUly</a></td></tr></tbody></table>


---

# Agent Instructions
This documentation is published with GitBook. GitBook is the documentation platform designed so that both humans and AI agents can read, navigate, and reason over technical content effectively. Learn more at gitbook.com.

## Querying This Documentation
If you need additional information that is not directly available in this page, you can query the documentation dynamically by asking a question.

Perform an HTTP GET request on the current page URL with the `ask` query parameter, and the optional `goal` query parameter:

```
GET https://helpdesk.smaply.app/account-and-team/customization/how-to-set-up-custom-branding.md?ask=<question>&goal=<endgoal>
```

`ask` is the immediate question: it should be specific, self-contained, and written in natural language.
`goal` is optional and describes the broader end goal you are ultimately trying to accomplish on behalf of the user. GitBook uses it to tailor the answer towards what is most useful for that goal.

The response will contain a direct answer to the question and relevant excerpts and sources from the documentation.

Use this mechanism when the answer is not explicitly present in the current page, you need clarification or additional context, or you want to retrieve related documentation sections.
