> For the complete documentation index, see [llms.txt](https://helpdesk.smaply.app/llms.txt). Markdown versions of documentation pages are available by appending `.md` to page URLs; this page is available as [Markdown](https://helpdesk.smaply.app/account-and-team/users-and-roles/access-levels-and-permissions.md).

# Access levels and permissions

Access in Smaply comes down to two choices. The *role* you give someone sets what they can do, and the *level* you invite them at sets where they can do it. This reference explains both so you can pick the right combination for each person on your team.

{% hint style="info" icon="clipboard-list" %}

#### In this guide

1. [The two parts of access: role and level](#the-two-parts-of-access-role-and-level)
2. [What each role can do](#what-each-role-can-do)
3. [How the three levels work](#how-the-three-levels-work)
4. [Viewers can comment on cards](#viewers-can-comment-on-cards)
5. [Change a role or remove access](#change-a-role-or-remove-access)
   {% endhint %}

#### The two parts of access: role and level

Every person you invite gets a role and a level, and the two are independent.

* **Role** - What the person can do: change things, edit content, or only look. The roles are **Admin**, **Editor**, and **Viewer**.
* **Level** - Where that role applies: across the whole account, inside one workspace, or on a single journey map.

Someone can be an Editor on one journey map and an Admin across the account. The role tells you their power, and the level tells you its reach.

***

#### What each role can do

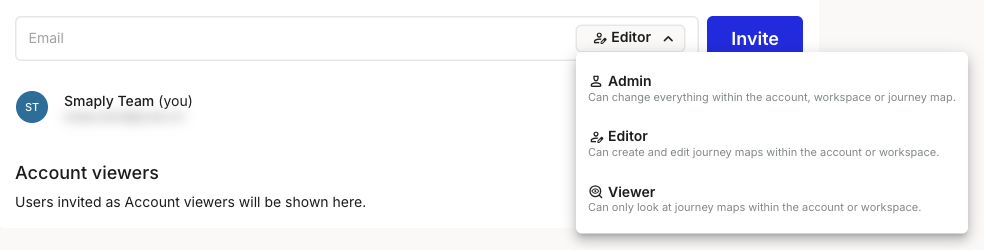
The same three roles are available wherever you invite someone, and the picker shows a one-line summary of each:

* **Admin** - Can change everything within the account, workspace, or journey map. Admins manage users and permissions, create, edit, and delete all content, configure integrations, manage the Account Library, and control structure and settings. An Admin at the account level can also create and delete workspaces, manage account-wide integrations, and change customization settings.
* **Editor** - Can create and edit journey maps, cards, personas, portfolio items, metrics, and research within their level. Editors can comment, use AI features, and link portfolio items across journeys. They can't manage users, change account settings, or configure integrations.
* **Viewer** - Can see everything within their level except its settings pages: an account Viewer opens every workspace and its content, a workspace Viewer opens everything in that workspace, and a map Viewer sees one journey map. Viewers can comment on journey map cards but can't edit, create, or delete anything.

<figure><img src="/files/iWS6myObxCa1hxaHqBFZ" alt="The role dropdown open when inviting a user, listing three roles: Admin (Can change everything within the account, workspace or journey map), Editor (Can create and edit journey maps within the account or workspace), and Viewer (Can only look at journey maps within the account or workspace)."><figcaption><p>The three roles in the invite role dropdown</p></figcaption></figure>

Here's how the roles compare:

|                             | **Admin**                           | **Editor**                          | **Viewer**                          |
| --------------------------- | ----------------------------------- | ----------------------------------- | ----------------------------------- |
| **Best for**                | Platform owners and team leads      | Service designers and core team     | Stakeholders, clients, reviewers    |
| **View content**            | <i class="fa-check">:check:</i> Yes | <i class="fa-check">:check:</i> Yes | <i class="fa-check">:check:</i> Yes |
| **Comment on cards**        | <i class="fa-check">:check:</i> Yes | <i class="fa-check">:check:</i> Yes | <i class="fa-check">:check:</i> Yes |
| **Create and edit content** | <i class="fa-check">:check:</i> Yes | <i class="fa-check">:check:</i> Yes | <i class="fa-xmark">:xmark:</i> No  |
| **Use AI features**         | <i class="fa-check">:check:</i> Yes | <i class="fa-check">:check:</i> Yes | <i class="fa-xmark">:xmark:</i> No  |
| **Manage users**            | <i class="fa-check">:check:</i> Yes | <i class="fa-xmark">:xmark:</i> No  | <i class="fa-xmark">:xmark:</i> No  |
| **Configure integrations**  | <i class="fa-check">:check:</i> Yes | <i class="fa-xmark">:xmark:</i> No  | <i class="fa-xmark">:xmark:</i> No  |

Integrations are configured once at the account level, so only an account Admin sets them up. Editors use the connected data on their maps but can't change the connection.

***

#### How the three levels work

The level you invite someone at sets how far their role reaches. Broader access cascades down to everything inside it.

* **Account level** - Reaches every workspace and every journey map in the account, plus the Account Library. Best for people who work across the whole organization.
* **Workspace level** - Reaches the journey maps, personas, portfolio items, metrics, and research in that one workspace, and nothing in other workspaces. Best for a project team or a department working on its own.
* **Journey map level** - Reaches a single journey map and its cards. The person sees nothing of the wider workspace or account. Best for a stakeholder or client reviewing one journey.

To keep someone out of everything except a single workspace, invite them at the workspace level rather than the account level. Account access can't be narrowed afterward; it always includes every workspace and map.

The cascade applies the same way for read-only access. An account Viewer sees every workspace and its content read-only, a workspace Viewer sees only that workspace, and a map Viewer sees only that map. None of them can open settings pages, and there's no partial-edit state in between: editing always needs an Editor or Admin role.

|                            | **Account level**                            | **Workspace level**                 | **Journey map level**                         |
| -------------------------- | -------------------------------------------- | ----------------------------------- | --------------------------------------------- |
| **Best for**               | People working across the whole organization | A single project team or department | One stakeholder or client reviewing a journey |
| **Reaches**                | Every workspace and journey map              | One workspace and its journey maps  | One journey map and its cards                 |
| **Sees other workspaces?** | <i class="fa-check">:check:</i> Yes          | <i class="fa-xmark">:xmark:</i> No  | <i class="fa-xmark">:xmark:</i> No            |

To put someone into one of these levels, see [How to invite users](/account-and-team/users-and-roles/how-to-invite-users.md).

***

#### Viewers can comment on cards

Commenting is separate from editing. Viewers can't change a journey map, but they can leave comments on its cards, which makes Viewer the right role for stakeholders and clients who need to give feedback without the risk of editing the map. Comments are limited to journey map cards and are available to every role.

***

#### Change a role or remove access

To adjust what someone can do, an Admin changes their role from the role dropdown on the user's row. You can move a person up or down between **Admin**, **Editor**, and **Viewer**, for example from Admin to Editor or from Editor to Viewer, raising or lowering their access. See [How to change a user's role](/account-and-team/users-and-roles/how-to-change-a-users-role.md).

To take someone's access away completely, remove them instead. That revokes their membership until you re-invite them. See [How to remove a user](/account-and-team/users-and-roles/how-to-remove-a-user.md).

#### Related topics

<table data-column-title-hidden data-view="cards"><thead><tr><th>Article</th><th>What it covers</th><th data-hidden data-card-target data-type="content-ref">Target</th></tr></thead><tbody><tr><td><strong>How to invite users</strong></td><td>Add someone at the account, workspace, or journey map level and pick their role.</td><td><a href="/pages/F1Nzd1jlynqOnRaG0WSM">/pages/F1Nzd1jlynqOnRaG0WSM</a></td></tr><tr><td><strong>How to change a user's role</strong></td><td>Switch someone between Admin, Editor, and Viewer after they're in.</td><td><a href="/pages/NwZSGMrWNr2EdTwknpdW">/pages/NwZSGMrWNr2EdTwknpdW</a></td></tr><tr><td><strong>How to remove a user</strong></td><td>Revoke access at the account or workspace level and what the person loses.</td><td><a href="/pages/kAHKecCimBhsc1BbbgkZ">/pages/kAHKecCimBhsc1BbbgkZ</a></td></tr><tr><td><strong>How to check seat usage</strong></td><td>See how many seats you're using and how viewer licenses are tracked.</td><td><a href="/pages/DSbAXM2ZSmZbbAkkZWSz">/pages/DSbAXM2ZSmZbbAkkZWSz</a></td></tr></tbody></table>


---

# Agent Instructions
This documentation is published with GitBook. GitBook is the documentation platform designed so that both humans and AI agents can read, navigate, and reason over technical content effectively. Learn more at gitbook.com.

## Querying This Documentation
If you need additional information that is not directly available in this page, you can query the documentation dynamically by asking a question.

Perform an HTTP GET request on the current page URL with the `ask` query parameter, and the optional `goal` query parameter:

```
GET https://helpdesk.smaply.app/account-and-team/users-and-roles/access-levels-and-permissions.md?ask=<question>&goal=<endgoal>
```

`ask` is the immediate question: it should be specific, self-contained, and written in natural language.
`goal` is optional and describes the broader end goal you are ultimately trying to accomplish on behalf of the user. GitBook uses it to tailor the answer towards what is most useful for that goal.

The response will contain a direct answer to the question and relevant excerpts and sources from the documentation.

Use this mechanism when the answer is not explicitly present in the current page, you need clarification or additional context, or you want to retrieve related documentation sections.
