> For the complete documentation index, see [llms.txt](https://helpdesk.smaply.app/llms.txt). Markdown versions of documentation pages are available by appending `.md` to page URLs; this page is available as [Markdown](https://helpdesk.smaply.app/integrations/metrics-tools/power-bi/how-to-set-up-the-power-bi-integration.md).

# How to set up the Power BI integration

An Admin connects Power BI once at the account level. After that, anyone in the workspace can build metrics from your datasets.

{% hint style="info" icon="clipboard-list" %}

#### In this guide

1. [Set up the Power BI integration](#set-up-the-power-bi-integration)
2. [Use Power BI in a metric](#use-power-bi-in-a-metric)
3. [Troubleshooting](#troubleshooting)
   {% endhint %}

#### Set up the Power BI integration

{% hint style="warning" icon="list-check" %}

#### Prerequisites

* Admin role at the Smaply account level
* A Microsoft Entra ID tenant and a Power BI workspace your organisation uses
* For service account auth: permission to register an app in Microsoft Entra ID, edit Power BI tenant settings, and add members to your Power BI workspaces
  {% endhint %}

In Smaply, go to **Account Settings > Integrations** and click **Set up** next to **Power BI**.

<figure><img src="/files/OitiSf1eFKVnCVNbnyhp" alt="Smaply Account settings page with the Integrations tab open. The Metrics integrations section lists Google Analytics, Office 365 Excel, Power BI, Google Sheets, and Qualtrics, each with a Set up button to the right."><figcaption><p>Account settings > Integrations</p></figcaption></figure>

The **Configure Power BI** page opens with two options under **Select integration type**: **Service account** (selected by default and marked **Recommended**) and **Login with your Power BI account (oAuth)**.

<figure><img src="/files/MiHSLlaDrtY4buH1HrIs" alt="Configure Power BI page in the unconfigured state. The left pane shows Select integration type with Service account selected (marked Recommended) and Login with your Power BI account (oAuth) below it. The right pane shows Power BI Service Account with a How to setup Power BI service account info panel and empty Tenant ID, Client ID, and Client Secret fields above a Save Service Account button."><figcaption><p>Configure Power BI, unconfigured</p></figcaption></figure>

Pick the authentication method that fits:

* [**Service account** ](#service-account-recommended)**(recommended)** - Uses a Microsoft Entra ID service principal, so the connection isn't tied to one person's login. Best when your team works on the same Smaply account.
* [**OAuth**](#oauth) - Simpler when only one person needs the data, or for connecting personal workspaces that can't have a security group assigned to them.

{% tabs %}
{% tab title="Service account (recommended)" %}
{% hint style="info" icon="tag" %}

#### Plan availability

Service account auth is available on the **Governance** plan. OAuth auth (the other tab) is available on all plans that include metrics integrations.
{% endhint %}

A service account is a Microsoft Entra ID app registration acting as a non-user identity, sometimes called a service principal. You register the app, grant it the right Power BI permissions, add it to a security group, give the group access to your workspaces, and enter the three credentials in Smaply.

Keep the **Configure Power BI** page open in another tab. You'll come back to it at the end of this flow to enter the credentials.

{% embed url="<https://files.gitbook.com/v0/b/gitbook-x-prod.appspot.com/o/spaces%2For99xDEElfps9uMDY60K%2Fuploads%2FFKNTmR4avuV0LF7WVvKy%2FPowerBI_API_Permissions.mp4?alt=media&token=efe55dbe-b132-4dda-ac3a-2e158c7663eb>" %}

{% stepper %}
{% step %}
**Register an app in Microsoft Entra ID**

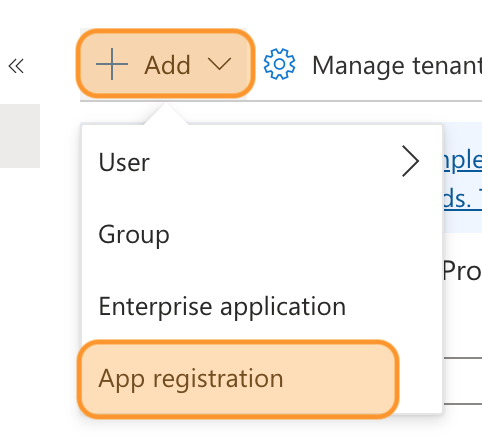
In the [Azure portal](https://portal.azure.com), open **Microsoft Entra ID** and click **+ Add > App registration**.

<figure><img src="/files/TEqzGjcNSAswajCalp6Y" alt="Microsoft Entra ID Add menu with the App registration option highlighted."><figcaption><p>Microsoft Entra ID > + Add > App registration</p></figcaption></figure>

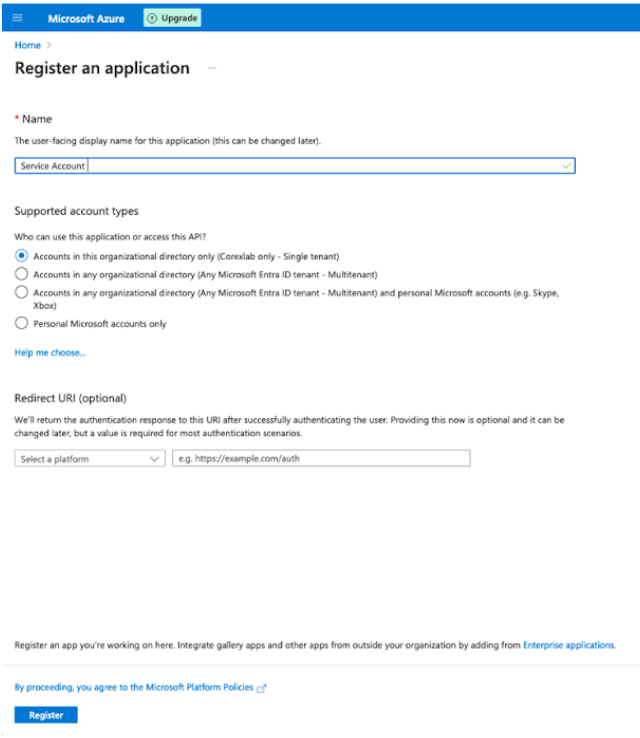
On the **Register an application** page, give the app a recognisable name (for example, `Smaply Power BI connector`), choose **Accounts in this organizational directory only (Single tenant)**, leave the **Redirect URI** blank, and click **Register**.

<figure><img src="/files/LZTPKC1s6ycn2jvjy8fH" alt="Azure Register an application form with a Name field, Supported account types set to single tenant, and an empty Redirect URI section."><figcaption><p>Register an application</p></figcaption></figure>

For full background on app registrations, see [Microsoft's quickstart on registering an application](https://learn.microsoft.com/entra/identity-platform/quickstart-register-app).
{% endstep %}

{% step %}
**Assign API permissions**

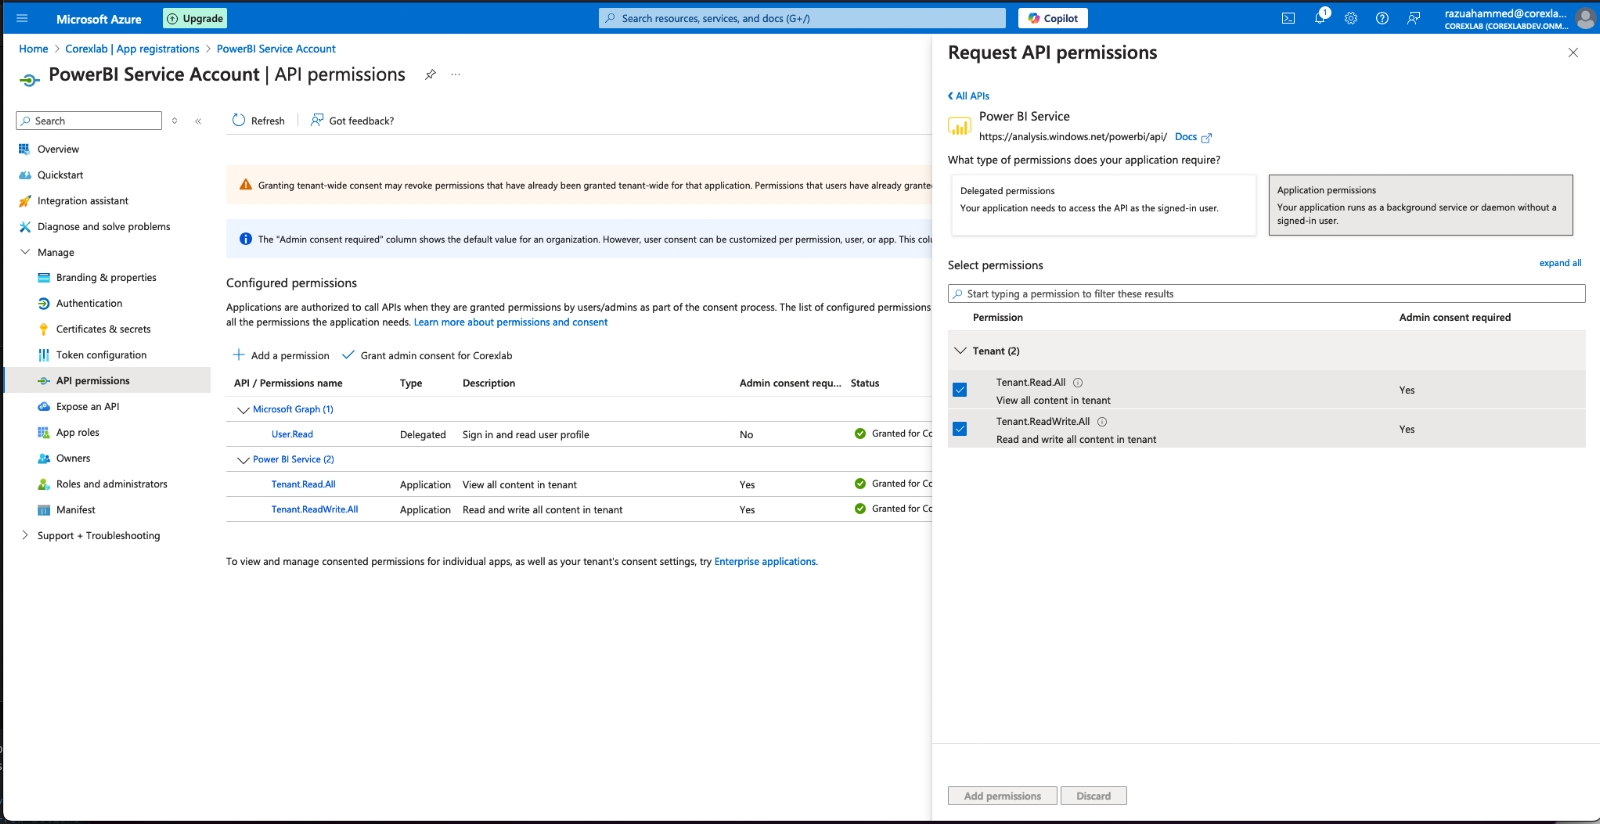
On the registered app, open **API permissions** and click **+ Add a permission**. Choose **Power BI Service**, then **Application permissions**, tick **Tenant.Read.All**, and click **Add permissions**.

<figure><img src="/files/ctdXDSqorUftqFvFopS2" alt="Azure API permissions pane with the Request API permissions side panel open. Power BI Service is selected, the Application permissions tab is active, and Tenant.Read.All is shown alongside Tenant.ReadWrite.All under the Tenant group."><figcaption><p>Power BI Service > Application permissions > Tenant.Read.All</p></figcaption></figure>

Back on the **API permissions** page, click **Grant admin consent for \[your tenant]** and confirm. Smaply only needs **Tenant.Read.All**. You can ignore **Tenant.ReadWrite.All**, which the screenshot above also shows ticked.

{% hint style="warning" %}

#### **Important: Without admin consent the connection looks fine but workspaces stay empty**

If the **Admin consent required** column says **Yes** but the **Status** isn't **Granted**, Smaply will authenticate successfully and then return an empty workspace list. The grant button only appears for a tenant admin.
{% endhint %}
{% endstep %}

{% step %}
**Generate a client secret**

In the same app, open **Certificates & secrets** and create a new client secret. Copy the secret **Value** immediately.

{% hint style="danger" %}

#### **Warning: The client secret value cannot be re-shown**

Azure displays the secret value only at creation time. Once you navigate away, only the secret ID stays visible. If you lose the value, generate a new secret.
{% endhint %}
{% endstep %}

{% step %}
**Create a security group and add the service principal**

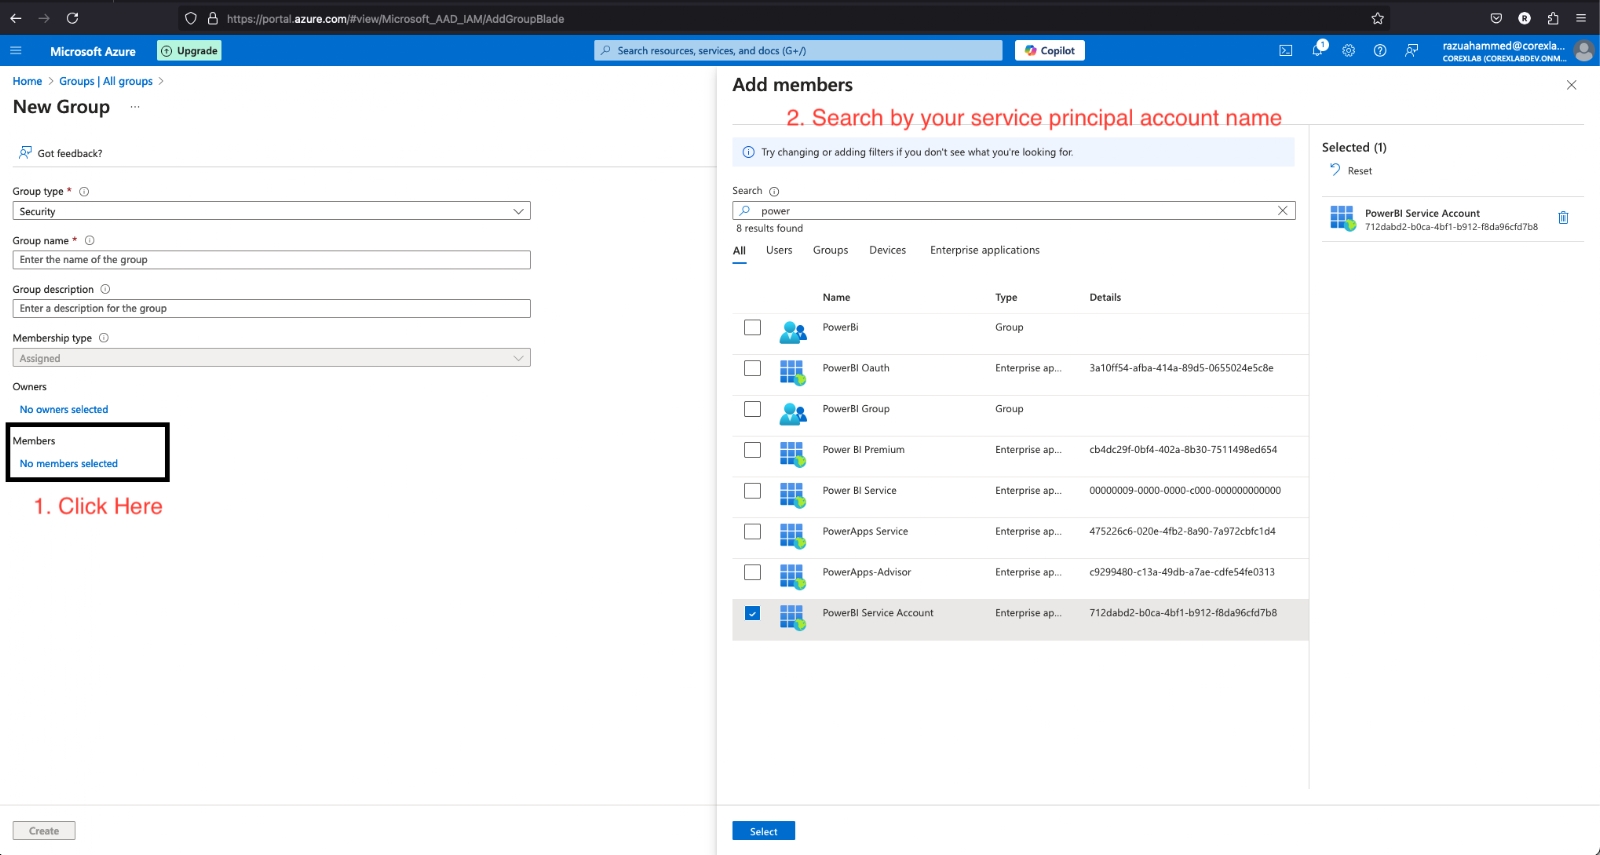
In Microsoft Entra ID, open **Groups > All groups** and click **New group**. Set **Group type** to **Security**, give the group a recognisable name (for example, `smaply-powerbi`), and add the registered app to the group as a member.

<figure><img src="/files/Xe1nCo7fzkFAMKCoSj9F" alt="Azure New Group form with Group type Security selected, alongside an Add members pane searching for power. The PowerBI Service Account enterprise application is ticked in the results list."><figcaption><p>New security group with the service principal added as a member</p></figcaption></figure>

To find the app in the **Add members** picker, search by the app name you used in step 1.

{% hint style="warning" %}

#### **Important: The group name has to match exactly across three places**

You'll reference this group name again in the Power BI tenant setting (step 5) and on each workspace (step 6). A mismatched character or different casing in any of the three places breaks the connection silently. Pick a name and reuse it verbatim.
{% endhint %}
{% endstep %}

{% step %}
**Enable the Power BI tenant setting for the group**

In the [Power BI Admin Portal](https://app.powerbi.com/admin-portal), open **Tenant settings > Developer settings > Service principals can call Fabric public APIs**. Microsoft previously called this setting **Allow service principals to use Power BI APIs**, so older guides and screenshots may use that name.

Switch the setting to **Enabled**, set **Apply to** to **Specific security groups**, type in the name of the security group you just created (for example, `smaply-powerbi`), and click **Apply**.

{% hint style="warning" %}

#### **Important: This step is the most common reason a setup looks correct but no workspaces appear**

Without this tenant setting enabled for the group, Smaply authenticates but every workspace and dataset list comes back empty. If you're not a Power BI tenant admin, ask whoever is to enable it before continuing. For the authoritative reference, see [Microsoft's documentation on enabling the Power BI service principal](https://learn.microsoft.com/power-bi/enterprise/service-premium-service-principal).
{% endhint %}
{% endstep %}

{% step %}
**Assign the security group to each Power BI workspace**

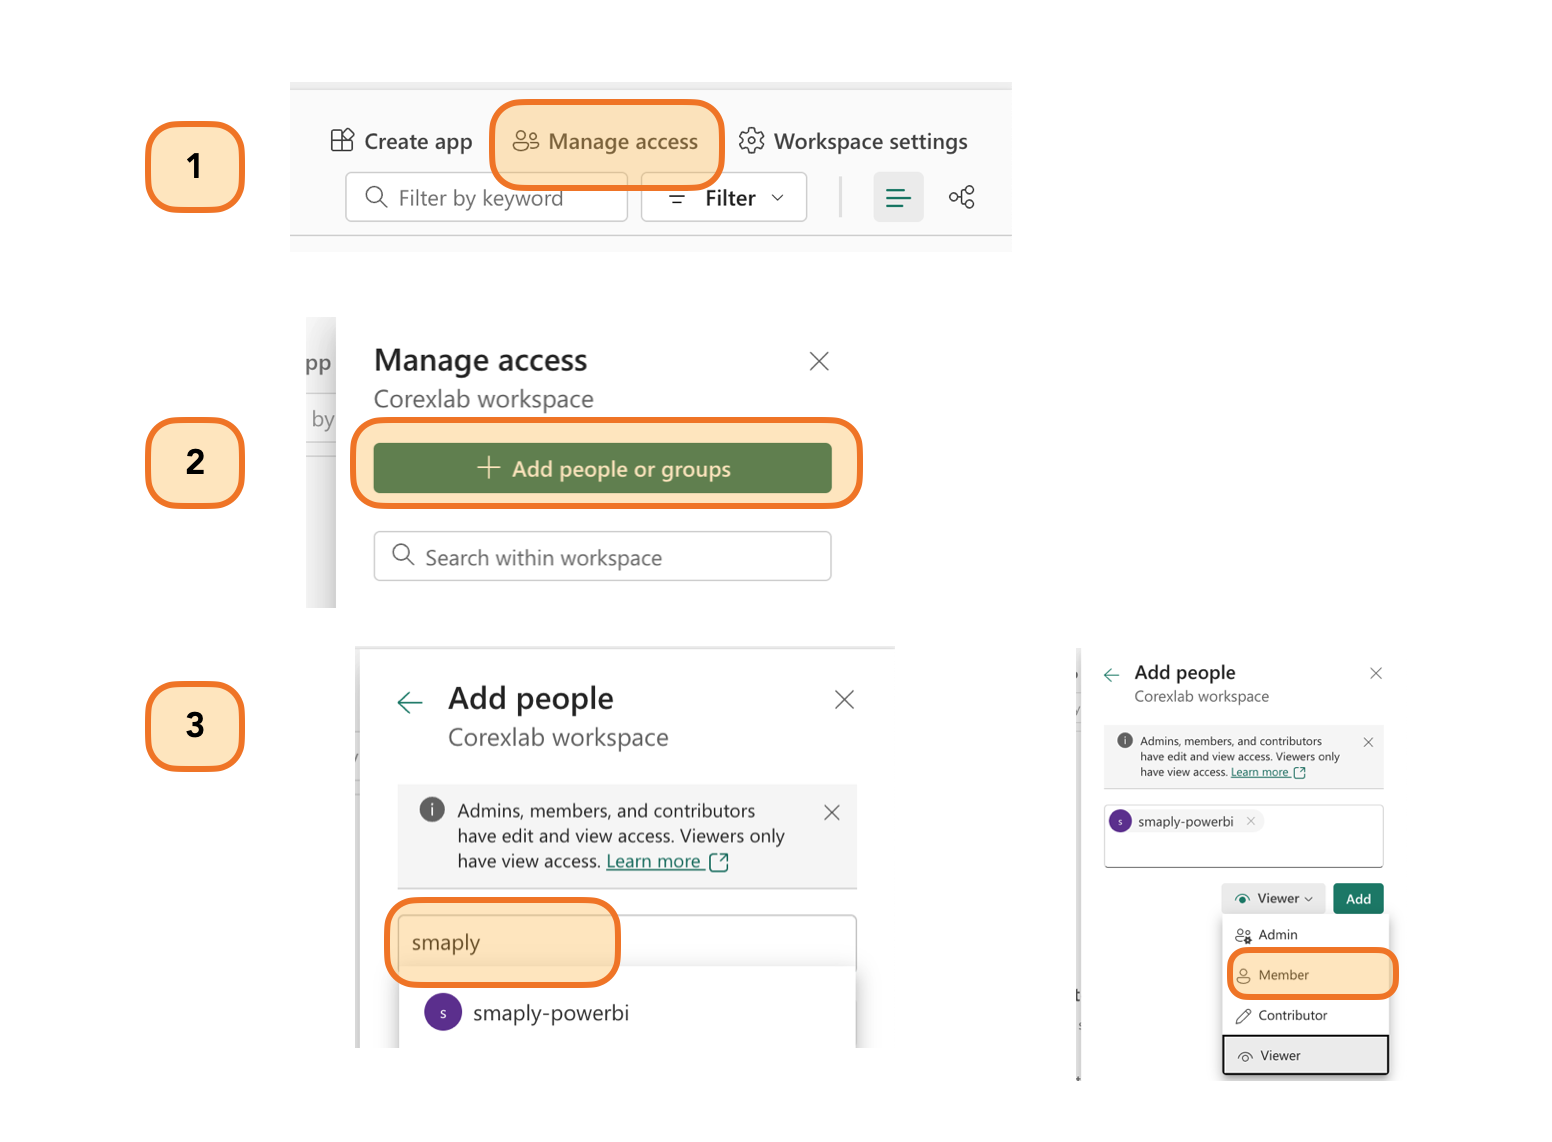
In Power BI, open each workspace you want Smaply to read. Click **Manage access**, then **+ Add people or groups**, search for the security group by name (for example, `smaply-powerbi`), set the role to **Member**, and click **Add**.

<figure><img src="/files/fxQBV8jobpyZ5zUnqc2r" alt="Power BI workspace Manage access flow shown as a three-step composite: the Manage access tab in workspace settings, the Manage access panel with an Add people or groups button, and an Add people search that returns the smaply-powerbi group with the Member role highlighted in the role dropdown."><figcaption><p>Manage access > + Add people or groups > pick the security group and assign Member</p></figcaption></figure>

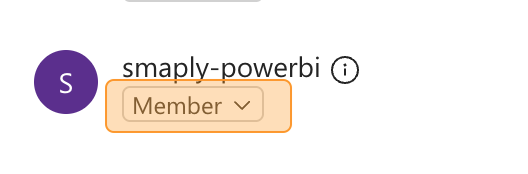
The group appears in the **Manage access** list with **Member** next to it.

<figure><img src="/files/bvyMQ8YJQkcLdbudLvz2" alt="Tight crop of the smaply-powerbi entry in the Manage access list with its role set to Member."><figcaption><p>Security group assigned as Member</p></figcaption></figure>

**Admin** also works, but **Member** is the minimum role Smaply needs to read datasets.

{% hint style="warning" %}

#### **Important: Wait 30 to 60 minutes for the assignment to propagate**

Power BI takes 30 to 60 minutes to propagate new workspace access for a service principal. Until propagation finishes, Smaply may show an empty workspace list or **Connection Error** even though the setup is correct. If everything looks right and the integration still doesn't work, wait out the full 30 to 60 minute window before re-checking.
{% endhint %}

Repeat for every workspace you plan to use. Personal workspaces (workspaces marked as **My workspace** in Power BI) can't have a security group assigned to them, so they aren't supported by the service account method. Use OAuth if you need to read from a personal workspace.
{% endstep %}

{% step %}
**Enter the credentials in Smaply**

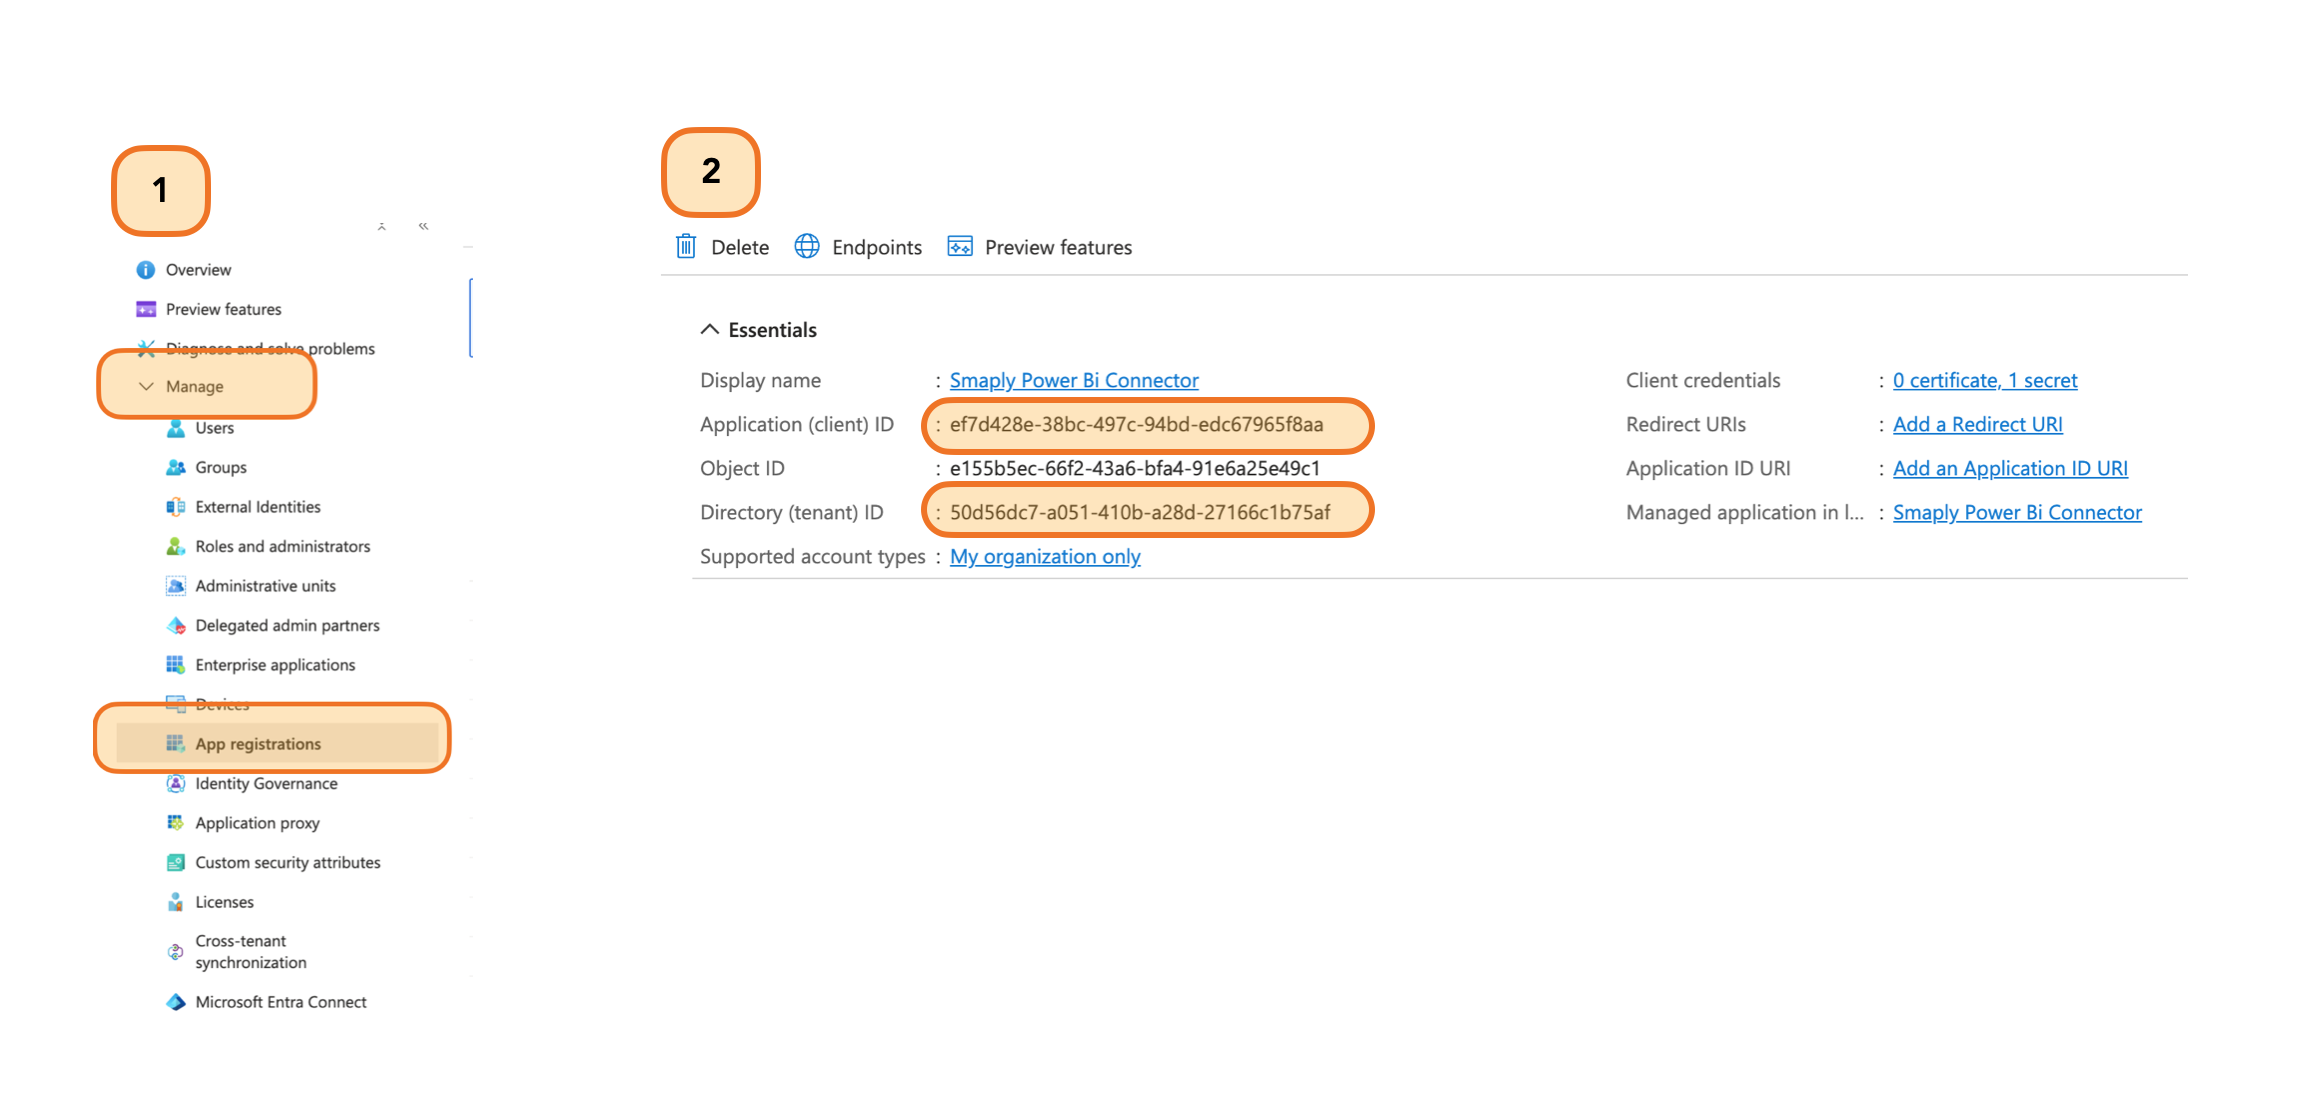
Back in Microsoft Entra ID, open the registered app's **Overview** page. Copy the **Application (client) ID** and the **Directory (tenant) ID**.

<figure><img src="/files/ylpwincOCmHLbBDzlY7N" alt="Microsoft Entra ID navigation with Manage > App registrations highlighted alongside the registered app&#x27;s Overview page. The Application (client) ID and Directory (tenant) ID values are highlighted."><figcaption><p>App registrations > Overview, with the two IDs Smaply needs</p></figcaption></figure>

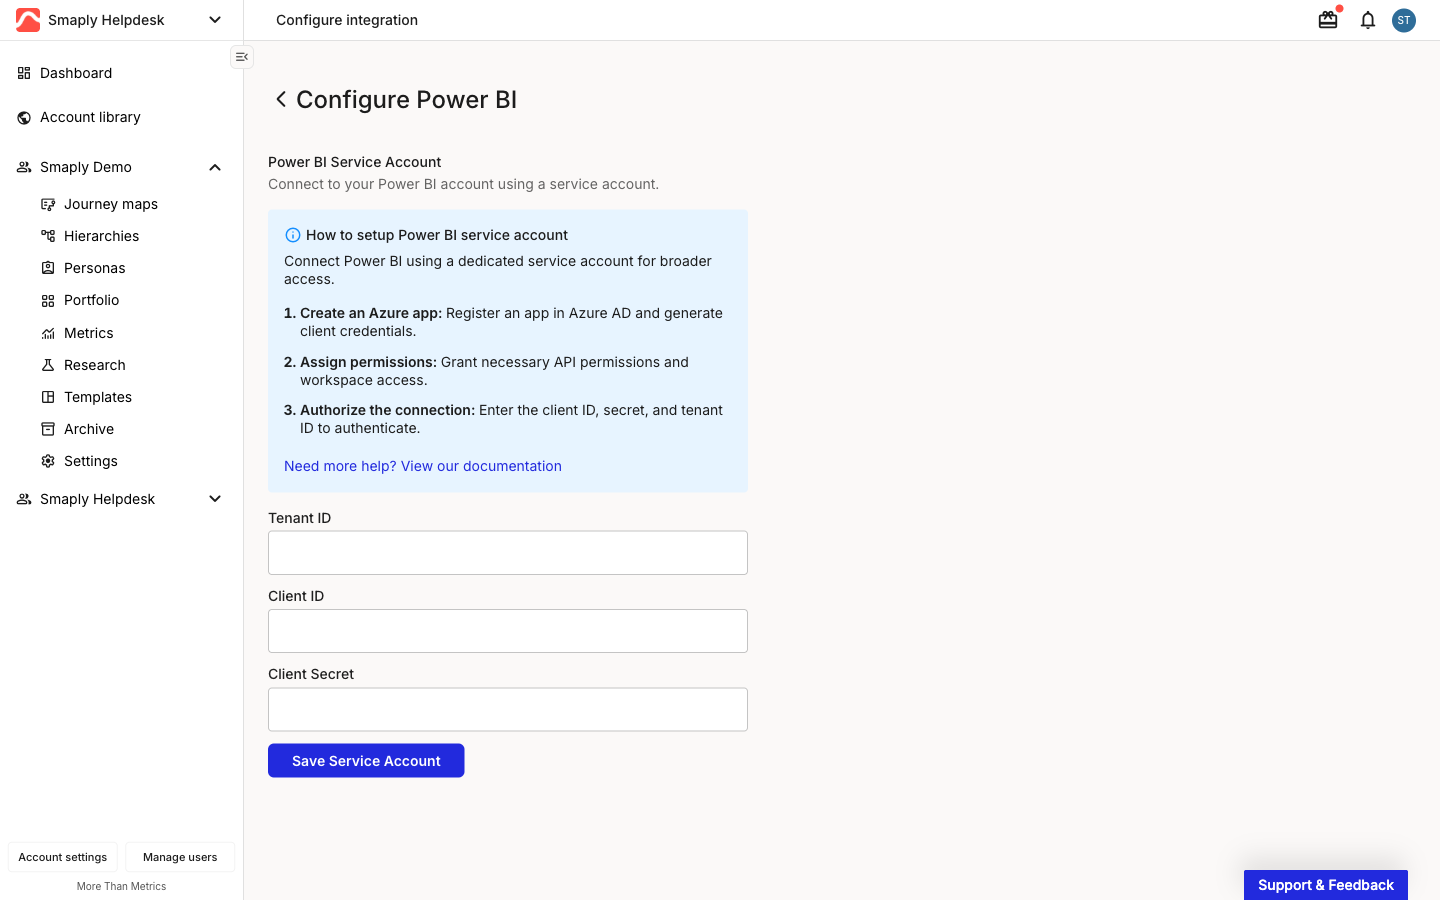
Return to the **Configure Power BI** page in Smaply and paste the values into the three fields:

* **Tenant ID** - The **Directory (tenant) ID** from the app overview.
* **Client ID** - The **Application (client) ID** from the same page.
* **Client Secret** - The secret **Value** you copied when you generated the client secret.

<figure><img src="/files/bvN8CcEqdCfyaChcy94S" alt="Configure Power BI page with the Service account integration type selected. The right pane shows Power BI Service Account with empty Tenant ID, Client ID, and Client Secret fields above a Save Service Account button, and a How to setup Power BI service account info panel above the form."><figcaption><p>Configure Power BI, Service account selected</p></figcaption></figure>

Click **Save Service Account**.
{% endstep %}
{% endstepper %}
{% endtab %}

{% tab title="OAuth" %}
OAuth signs Smaply in as you. The connection inherits whatever Power BI workspaces your Microsoft account already has access to, and tokens are tied to your individual permissions in Microsoft.

{% hint style="warning" icon="list-check" %}

#### Prerequisites

* A Microsoft account with read access to the Power BI workspaces you want to use
* If your organisation requires admin approval for third-party app consent, a Microsoft tenant admin available to approve the grant
  {% endhint %}

{% stepper %}
{% step %}
**Choose Login with your Power BI account (oAuth)**

On the **Configure Power BI** page, select **Login with your Power BI account (oAuth)**. The right pane changes to **Connect Power BI** with a three-step info panel and the **Connect Power BI** button.

<figure><img src="/files/XAl5ebOx1Vpegzfjv8uS" alt="Configure Power BI page with Login with your Power BI account (oAuth) selected. The right pane shows Connect Power BI with a How to setup Power BI OAuth info panel listing three numbered steps and a Connect Power BI button below."><figcaption><p>Configure Power BI, OAuth selected</p></figcaption></figure>

Click **Connect Power BI**. Smaply redirects you to Microsoft.
{% endstep %}

{% step %}
**Sign in and grant permissions**

Sign in with the Microsoft account that has access to the Power BI workspaces you want to use in Smaply. On Microsoft's consent screen, click **Accept** to grant the three permissions Smaply requests:

* **Read all datasets and reports that you have access to**
* **Sign you in and read your profile**
* Optionally, **Consent on behalf of your organization** (only available to tenant admins)

If your Microsoft organisation requires admin approval for third-party apps, the consent screen tells you to ask an admin instead. The connection completes once an admin approves it.
{% endstep %}

{% step %}
**Authorise the connection**

Microsoft sends you back to Smaply. The **Configure Power BI** page shows the connected state, with the connecting account listed under **Added by**. Smaply refreshes OAuth tokens automatically, so you don't need to sign in again unless the token is revoked.

{% hint style="warning" %}
If you sign out of Microsoft, revoke Smaply's access in your Microsoft account, or lose access to a Power BI workspace, the connection drops and metrics that depend on it stop pulling data. For team-wide use, switch to a Service account so the connection isn't tied to one person's login.
{% endhint %}
{% endstep %}
{% endstepper %}
{% endtab %}
{% endtabs %}

***

#### Verify the setup

After saving credentials, open the Configure Power BI page. If your workspaces appear in the picker, the connection is working.

<details>

<summary><strong>Verify end-to-end with the verification tool (<code>powerbi_troubleshooting.zip</code>, Python 3.6+)</strong></summary>

`powerbi_troubleshooting.zip` is a Python 3.6+ script that checks the three exact-match conditions the integration depends on: workspace name, table name, and security group name.

You need Python 3.6 or higher installed:

* **Windows** - [download Python](https://www.python.org/downloads/) and run the installer.
* **Mac** - `brew install python3`
* **Linux** - `sudo apt-get install python3`

Download the tool below, unzip it, and follow the instructions in `test_scripts/README` inside the archive. Run the script after setup completes, read the output carefully, and share it with Smaply support if you escalate.

{% file src="/files/sf0X4h4e5EnEB4mmejI1" %}

</details>

If workspaces don't appear or any check fails, see Troubleshooting below.

***

#### Use Power BI in a metric

With the connection verified, anyone in your account can add Power BI data to a metric card on any journey map. See [How to use Power BI in a metric](/integrations/metrics-tools/power-bi/how-to-use-power-bi-in-a-metric.md) for the field mapping and dataset selection.

{% embed url="<https://files.gitbook.com/v0/b/gitbook-x-prod.appspot.com/o/spaces%2For99xDEElfps9uMDY60K%2Fuploads%2FH3LVqfTRJJxtLWX6U3sQ%2FConnecting%20Power%20BI%20to%20Smaply%20Metrics.mp4?alt=media&token=8c9136b6-c3f1-4bdd-a4e1-548f1ce0bc77>" %}

***

#### Troubleshooting

The Integrations tab in Account Settings shows the integration's current state. Pick the symptom below that matches what you're seeing.

<details>

<summary><strong>Connection Failed or Connection Error banner</strong> - Connection issue</summary>

A red banner on the **Configure Power BI** page means Smaply cannot reach Power BI with the stored credentials.

* For service account: re-check the **Tenant ID**, **Client ID**, and **Client Secret** values for typos or trailing whitespace, and confirm the client secret hasn't expired in Microsoft Entra ID. If you're inside the propagation window (the first 30 to 60 minutes after assigning workspace access), wait until it elapses before troubleshooting further.
* For OAuth: click **Connect Power BI** again from the Configure page. The token may have expired or been revoked.

</details>

<details>

<summary><strong>The workspace picker is empty or shows "no workspaces"</strong> - Configuration issue</summary>

The connection succeeds but no workspaces appear in the metric builder. The fix depends on which exact-match constraint slipped:

* **Tenant setting not enabled for the group.** Open the Power BI Admin Portal, **Tenant settings > Service principals can call Fabric public APIs**, and confirm it's enabled and applied to the security group your service principal belongs to.
* **Security group name mismatched across surfaces.** The group's exact name (case included) has to match in three places: the Microsoft Entra ID group itself, the Power BI tenant setting's **Specific security groups** entry, and the **Manage access** assignment on each workspace. A single character off in any of the three breaks workspace listing silently.
* **Propagation wait not elapsed.** Power BI takes 30 to 60 minutes to propagate a new workspace assignment. If you've assigned access in the last 30 to 60 minutes, wait and try again.

</details>

<details>

<summary><strong>A metric returns no data or unexpected values</strong> - Data issue</summary>

The connection works but the metric returns nothing or values that don't look right.

* Confirm the service principal (or your OAuth account) has been added to the source workspace with at least **Member** access. The workspace can be visible in the picker without the dataset being readable.
* Open the dataset in Power BI and confirm it has been refreshed recently. Smaply reads whatever Power BI has cached, so a failed dataset refresh shows as stale or empty data on the Smaply side.
* Verify the **Workspace**, **Dataset**, and the table or column the metric points at still exist with the same names. Renaming or moving any of them in Power BI breaks the metric until it's re-pointed.

</details>

<details>

<summary><strong>OAuth: Microsoft asked for admin approval</strong> - Authentication issue</summary>

The Microsoft consent screen tells you the app needs admin approval before you can complete the connection.

* Some Microsoft organisations require a tenant admin to pre-approve third-party app grants. Ask your Microsoft admin to approve Smaply for the tenant, then return to the **Configure Power BI** page and click **Connect Power BI** again.
* If admin approval isn't an option for your org, use the Service account method instead.

</details>

<details>

<summary><strong>OAuth: Previously working integration stopped pulling</strong> - Token revoked</summary>

Metrics that worked previously show errors and stop pulling data.

* The most common cause is the OAuth grant being revoked, either by the user signing out of Microsoft everywhere, or by a tenant admin removing the Smaply app from approved apps. Open the **Configure Power BI** page and click **Connect Power BI** to re-establish the grant.
* If the same user keeps losing the connection, switch to a Service account so the connection isn't tied to one person's Microsoft session.

</details>

<details>

<summary><strong>Personal workspaces don't work with Service account</strong> - Edge case</summary>

A Power BI workspace marked as **My workspace** can't have a security group assigned to it, so the service principal can't be granted access.

* Use the OAuth method to read from a personal workspace, signed in as the workspace owner.
* If you want the data in a Smaply metric long-term, move the dataset into a shared workspace and assign the security group there.

</details>

For wider questions about how integrations behave across tools (refresh frequency, switching auth, what happens on disconnect), see [How to manage integrations](/integrations/how-to-manage-integrations-at-account-level.md).

{% hint style="info" icon="headset" %}
**Still not working?** Contact support at <code class="expression">space.vars.supportEmail</code>
{% endhint %}

***

#### Related topics

<table data-column-title-hidden data-view="cards"><thead><tr><th>Title</th><th>Description</th><th data-hidden data-card-target data-type="content-ref">Target</th></tr></thead><tbody><tr><td><strong>Manage integrations</strong></td><td>Disconnect, switch auth, and read connection states across all integrations.</td><td><a href="/pages/eVJNZWbpULcbx2YE06fQ">/pages/eVJNZWbpULcbx2YE06fQ</a></td></tr><tr><td><strong>Create and configure a metric</strong></td><td>The full metric creation flow, including types, charts, and filters.</td><td><a href="/pages/UlZ0vwT23WaSlpB6ae7r">/pages/UlZ0vwT23WaSlpB6ae7r</a></td></tr><tr><td><strong>Metric cards</strong></td><td>Adding metric cards to a journey map and customising their display per card.</td><td><a href="/pages/598LDg8aKf90gVjRC9GG">/pages/598LDg8aKf90gVjRC9GG</a></td></tr><tr><td><strong>Embed cards</strong></td><td>Embed a Power BI report as live content on a journey map instead of pulling values as a metric.</td><td><a href="/pages/OZrRWKElbHcwoxQO8mln">/pages/OZrRWKElbHcwoxQO8mln</a></td></tr></tbody></table>


---

# Agent Instructions
This documentation is published with GitBook. GitBook is the documentation platform designed so that both humans and AI agents can read, navigate, and reason over technical content effectively. Learn more at gitbook.com.

## Querying This Documentation
If you need additional information that is not directly available in this page, you can query the documentation dynamically by asking a question.

Perform an HTTP GET request on the current page URL with the `ask` query parameter, and the optional `goal` query parameter:

```
GET https://helpdesk.smaply.app/integrations/metrics-tools/power-bi/how-to-set-up-the-power-bi-integration.md?ask=<question>&goal=<endgoal>
```

`ask` is the immediate question: it should be specific, self-contained, and written in natural language.
`goal` is optional and describes the broader end goal you are ultimately trying to accomplish on behalf of the user. GitBook uses it to tailor the answer towards what is most useful for that goal.

The response will contain a direct answer to the question and relevant excerpts and sources from the documentation.

Use this mechanism when the answer is not explicitly present in the current page, you need clarification or additional context, or you want to retrieve related documentation sections.