For the complete documentation index, see llms.txt. This page is also available as Markdown.

How to add and manage lanes

Add the horizontal rows that structure a journey map, then rename, recolour, reorder, pin, duplicate, and delete them.

A lane is a horizontal row of a journey map, holding one dimension of the experience across every step. To add one, click + Add lane and pick a type from the picker. To manage an existing lane, open its three-dot menu for pinning, recolouring, reordering, duplicating, and deleting.


How to add a lane

Each lane has a + Add lane button above it, and there is one below the last lane, so you can insert a row exactly where you want it. Clicking it opens the picker.

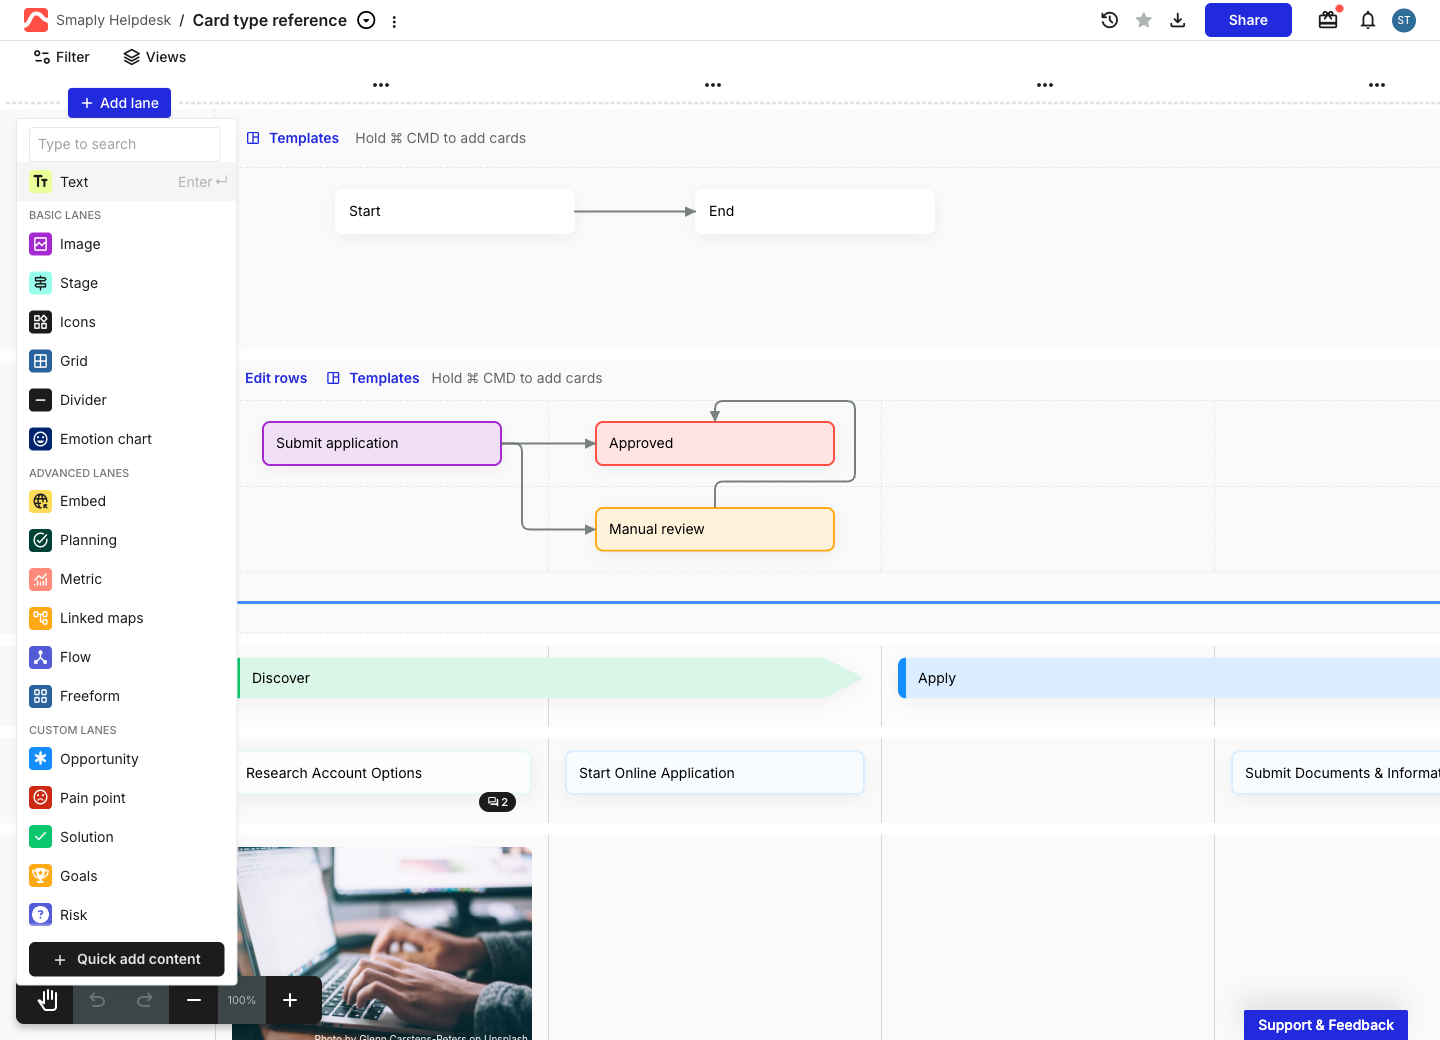
The Add lane picker open below the + Add lane button. A search box reads Type to search with Text as the Enter quick-select. BASIC LANES lists Image, Stage, Icons, Grid, Flow, a greyed Freeform, Divider, and Emotion chart. ADVANCED LANES lists Embed, Planning, Metric, and Linked maps. CUSTOM LANES lists Opportunity, Pain point, Solution, Goals, and Risk. A + Quick add content button is pinned at the bottom.
The Add lane picker, grouped into Basic, Advanced, and Custom lanes
Start typing in the search box to filter the list, or pick a type from one of three groups:

  • BASIC LANES - Image, Stage, Icons, Grid, Flow, Freeform, Divider, and Emotion chart.

  • ADVANCED LANES - Embed, Planning, Metric, and Linked maps.

  • CUSTOM LANES - the portfolio item types in your account: Opportunity, Pain point, Solution, Goals, and Risk.

The lane types you see depend on your plan, so the picker may not show every option above.

Text is the default. Press Enter to add a text lane without leaving the keyboard, or click it in the picker. A text lane holds one text card per step, which makes it the row to reach for first when you're laying out narrative content like steps, actions, or thinking.

The lane type only sets the default card for that row. You can still drop any card type into most lanes. The two exceptions are emotion chart lanes and divider lanes, which hold their own content and don't take arbitrary cards. See How to add and edit cards.


Quick add content

The + Quick add content button pinned at the bottom of the Add lane picker builds several lanes at once, instead of adding them one row at a time. It opens the Quick add journey content dialog, which has two tabs.

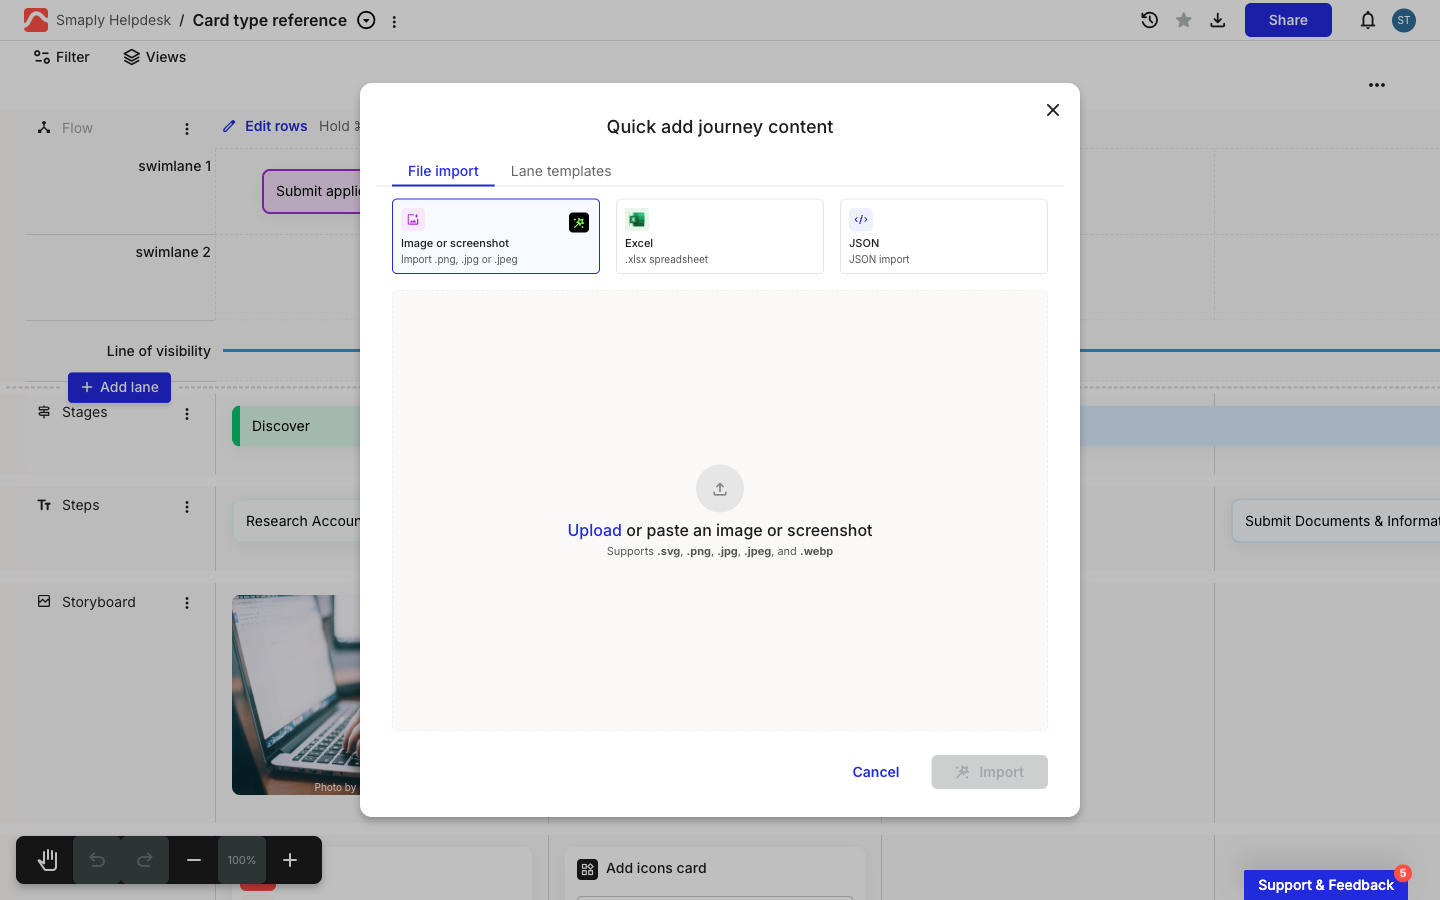
The Quick add journey content dialog on its File import tab. Three source cards sit at the top: Image or screenshot with an AI icon (selected), Excel, and JSON. Below them a dropzone reads Upload or paste an image or screenshot, supporting .svg, .png, .jpg, .jpeg, and .webp, with Cancel and Import buttons.
Quick add content, File import tab
  • File import - build lanes from a file. Pick Image or screenshot to have AI read a picture of a journey or framework and draft lanes from it, Excel to map a spreadsheet's rows and columns into lanes, or JSON to bring in a map exported from Smaply. This adds lanes to the map you're in. To import a whole map as a new journey instead, use the Import button on the journey maps list. See How to import from image, How to import from Excel, and How to import from JSON.

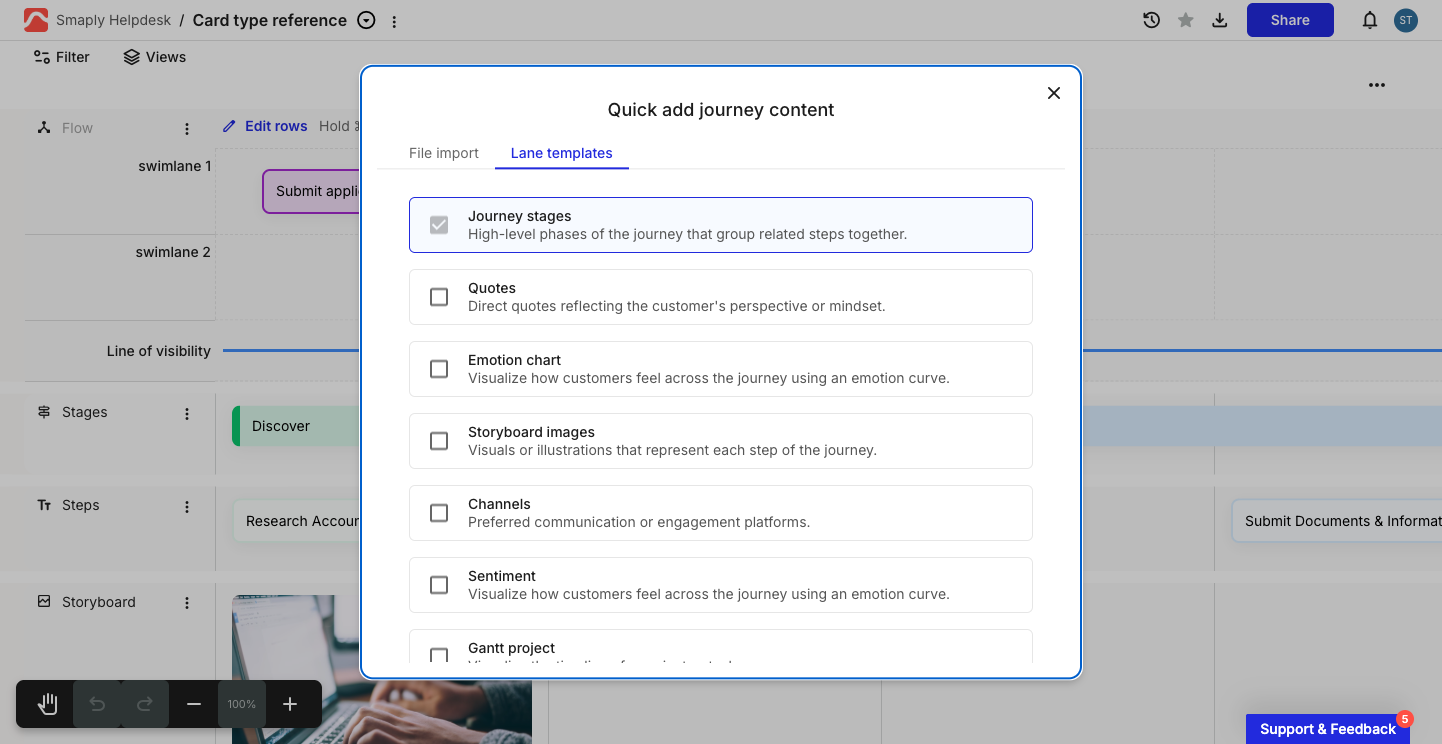
  • Lane templates - tick the common lanes you want and add them in one go: Journey stages, Quotes, Emotion chart, Storyboard images, Channels, Sentiment, and Gantt project. Then click Add journey content.

The Quick add journey content dialog on its Lane templates tab. A checklist offers Journey stages (pre-selected), Quotes, Emotion chart, Storyboard images, Channels, Sentiment, and Gantt project, each with a short description.
Quick add content, Lane templates tab
How to manage a lane

Every lane has a three-dot menu next to its title. Open it to rename, recolour, reorder, pin, duplicate, or delete the lane.

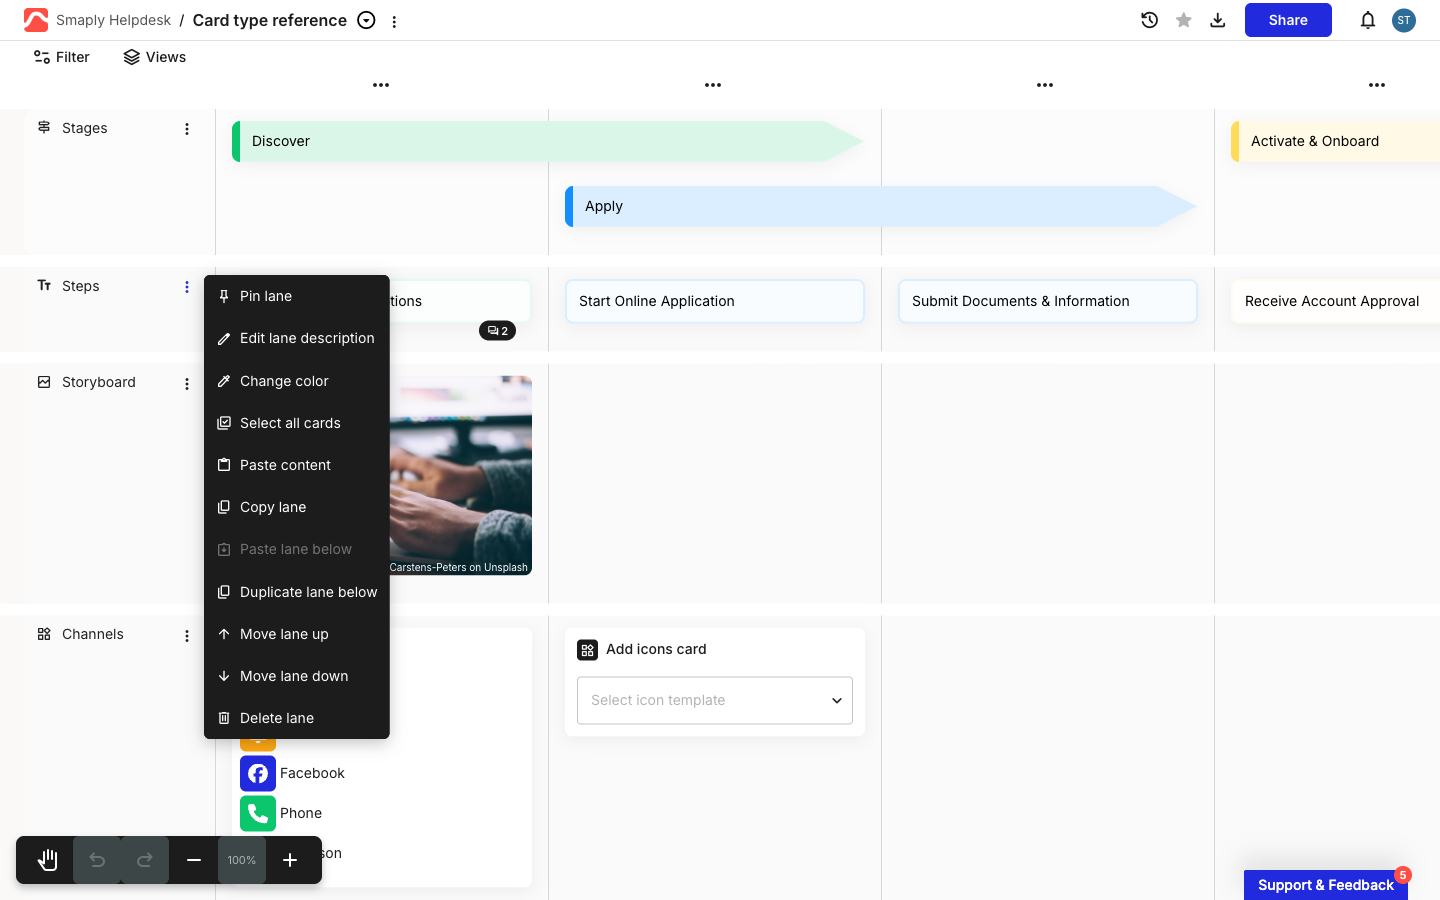
A lane three-dot menu open on a text lane labelled Steps. The menu lists Pin lane, Edit lane description, Change color, Select all cards, Paste content, Copy lane, Paste lane below (greyed out), Duplicate lane below, Move lane up, Move lane down, and Delete lane.
The three-dot menu on a text lane

The menu holds these options:

  • Pin lane - keep the lane in view while you scroll the map vertically. Useful for a Stages or Steps row you want as a constant reference.

  • Edit lane description - add a short note describing what the lane captures.

  • Change color - set the lane's accent colour, which its cards pick up by default.

  • Select all cards - select every card in the lane at once, ready for a bulk action. See How to bulk edit cards.

  • Paste content - paste copied content into the lane. Pasting a list or spreadsheet here fans it out into one card per row. See How to use enhanced paste.

  • Copy lane and Paste lane below - copy the whole lane, then paste a copy below another lane. Paste lane below stays greyed out until you've copied a lane.

  • Duplicate lane below - drop a copy of the lane, with its cards, directly beneath it.

  • Move lane up and Move lane down - reorder the lane one row at a time. You can also drag a lane by its title to reposition it.

  • Delete lane - remove the lane and everything in it.

Important: Deleting a lane removes its cards too

Some lane types show a shorter menu. Emotion chart and divider lanes drop the card and clipboard options (they don't hold ordinary cards) and add one type-specific option instead. Those live in the lane-type articles below.


Last updated