> For the complete documentation index, see [llms.txt](https://helpdesk.smaply.app/llms.txt). Markdown versions of documentation pages are available by appending `.md` to page URLs; this page is available as [Markdown](https://helpdesk.smaply.app/personas/how-to-assign-a-persona-to-a-card.md).

# How to assign a persona to a card

Mark which customer a card applies to by assigning one or more personas to it. Assigned personas show as small avatars on the card and let you filter the whole map down to a single persona's experience.

{% hint style="warning" icon="list-check" %}

#### Prerequisites

* At least one persona in your workspace. See [How to create a persona](/personas/how-to-create-a-persona.md).
* Editor or Admin access to the journey map.
  {% endhint %}

{% hint style="info" icon="clipboard-list" %}

#### In this guide

1. [How to assign a persona from the card details panel](#how-to-assign-a-persona-from-the-card-details-panel)
2. [How assigned personas appear on the card](#how-assigned-personas-appear-on-the-card)
3. [How to remove a persona from a card](#how-to-remove-a-persona-from-a-card)
4. [How to assign a persona to several cards at once](#how-to-assign-a-persona-to-several-cards-at-once)
   {% endhint %}

#### How to assign a persona from the card details panel

{% stepper %}
{% step %}
**Open the card's details panel**

Click the card, then click **Show card details** on the card toolbar. You can also double-click the card. The details panel slides in from the right.
{% endstep %}

{% step %}
**Open the Personas section**

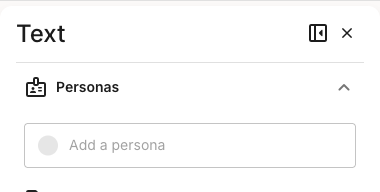
In the panel, expand the **Personas** section and click the **Add a persona** field.

<figure><img src="/files/ZdjfRQ206DvyDSU8d3mb" alt="The card details panel with the Personas section expanded. An empty Add a persona field sits below the section heading, ready to assign the first persona."><figcaption><p>Card details > Personas</p></figcaption></figure>
{% endstep %}

{% step %}
**Pick a persona from the dropdown**

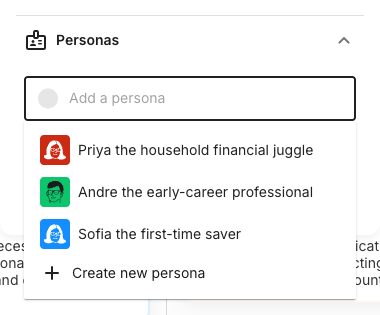
The dropdown lists every persona in the workspace, each with its colored avatar. Click the one you want to assign to the card.

<figure><img src="/files/mbuG6wuRcfA8jBaHbejB" alt="The Add a persona dropdown open, listing three workspace personas, each with a colored avatar: Priya the household financial juggler, Andre the early-career professional, and Sofia the first-time saver. A + Create new persona option sits at the bottom."><figcaption><p>Add a persona dropdown</p></figcaption></figure>

To assign more than one persona, open the field again and pick another. There's no limit on how many a card can carry. Personas already on the card drop out of the dropdown the next time you open it.

If the persona you need doesn't exist yet, click **+ Create new persona** at the bottom of the dropdown to build it without leaving the map. For the full persona setup, see [How to create a persona](/personas/how-to-create-a-persona.md).
{% endstep %}
{% endstepper %}

***

#### How assigned personas appear on the card

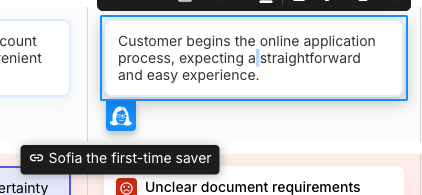
An assigned persona shows as a small colored avatar at the card's bottom-left. It sits tucked under the edge of the card at rest and expands to a full avatar when you select the card. Hover the avatar to see the persona's full name.

<figure><img src="/files/O0Nt1Yp0LAUZgqXgMitt" alt="A selected journey map card reading &#x27;Customer begins the online application process, expecting a straightforward and easy experience.&#x27; A blue persona avatar sits at the card&#x27;s bottom-left, expanded because the card is selected, with a tooltip reading &#x27;Sofia the first-time saver&#x27;."><figcaption><p>Assigned persona on a selected card</p></figcaption></figure>

When a card carries several personas, their avatars line up in a row along the bottom edge. Once cards have personas assigned, you can narrow the whole map to one persona at a time. See [How to filter a journey map by persona](/personas/how-to-filter-a-journey-map-by-persona.md).

***

#### How to remove a persona from a card

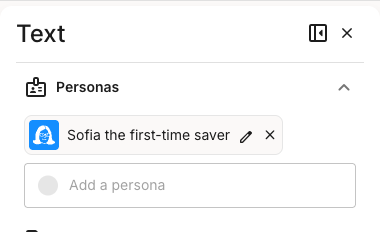
Open the card's details panel and expand **Personas**. Each assigned persona appears as a chip with an edit pencil and a remove **x**. Click the **x** to take the persona off the card.

<figure><img src="/files/hakSoZN8iKxwe10Ad6Qb" alt="The Personas section of a card details panel with Sofia the first-time saver assigned. Her chip shows the blue avatar, her name, an edit pencil, and a remove x. An empty Add a persona field sits below for assigning more."><figcaption><p>Personas section with one persona assigned</p></figcaption></figure>

The persona is removed from the card straight away, with no confirmation. This only un-assigns it from this card. The persona itself stays in your workspace, along with any other cards it's assigned to.

***

#### How to assign a persona to several cards at once

To assign a persona to a batch of cards in one action, select the cards first, then use the bulk toolbar.

Shift+click each card you want, or use **Select all cards** on a lane or column to grab a whole row or step. The bulk action bar appears at the bottom of the editor. Click **Persona**, then pick the persona to apply it to every selected card.

<figure><img src="/files/KhGLj3S9qW9LJpBGQ0w9" alt="The bulk action bar at the bottom of the journey map editor, labeled &#x27;Bulk edit, 3 text cards&#x27;. It shows formatting controls followed by Header, Tags, a Persona action with a person icon, and Delete."><figcaption><p>Bulk action bar with the Persona action</p></figcaption></figure>

The **Persona** action works the same way on a mixed selection of card types. For the full multi-select flow and the other bulk actions, see [How to bulk edit cards](/journey-maps/how-to-bulk-edit-cards.md).

***

#### Related topics

<table data-column-title-hidden data-view="cards"><thead><tr><th>Title</th><th>Description</th><th data-hidden data-card-target data-type="content-ref">Target</th></tr></thead><tbody><tr><td><strong>Filter a journey map by persona</strong></td><td>Narrow a map to the cards relevant to one persona at a time.</td><td><a href="/pages/zxwopszZeIAP89VtDjFI">/pages/zxwopszZeIAP89VtDjFI</a></td></tr><tr><td><strong>Create a persona</strong></td><td>Build a structured persona profile in your workspace so it's available to assign.</td><td><a href="/pages/q92JEZ67HauDof23i4mL">/pages/q92JEZ67HauDof23i4mL</a></td></tr><tr><td><strong>Add and edit cards</strong></td><td>Add cards, edit them inline, and use the card details panel and toolbar.</td><td><a href="/pages/DI00pTOdaJmOwltHKgIa">/pages/DI00pTOdaJmOwltHKgIa</a></td></tr><tr><td><strong>Bulk edit cards</strong></td><td>Select multiple cards and apply tags, personas, or other changes at once.</td><td><a href="/pages/D239Y2x0Gzcz0VuWHA1p">/pages/D239Y2x0Gzcz0VuWHA1p</a></td></tr></tbody></table>


---

# Agent Instructions
This documentation is published with GitBook. GitBook is the documentation platform designed so that both humans and AI agents can read, navigate, and reason over technical content effectively. Learn more at gitbook.com.

## Querying This Documentation
If you need additional information that is not directly available in this page, you can query the documentation dynamically by asking a question.

Perform an HTTP GET request on the current page URL with the `ask` query parameter, and the optional `goal` query parameter:

```
GET https://helpdesk.smaply.app/personas/how-to-assign-a-persona-to-a-card.md?ask=<question>&goal=<endgoal>
```

`ask` is the immediate question: it should be specific, self-contained, and written in natural language.
`goal` is optional and describes the broader end goal you are ultimately trying to accomplish on behalf of the user. GitBook uses it to tailor the answer towards what is most useful for that goal.

The response will contain a direct answer to the question and relevant excerpts and sources from the documentation.

Use this mechanism when the answer is not explicitly present in the current page, you need clarification or additional context, or you want to retrieve related documentation sections.