> For the complete documentation index, see [llms.txt](https://helpdesk.smaply.app/llms.txt). Markdown versions of documentation pages are available by appending `.md` to page URLs; this page is available as [Markdown](https://helpdesk.smaply.app/personas/how-to-create-a-persona.md).

# How to create a persona

Build a structured profile for a customer archetype you can assign to journey map cards, use in emotion charts, and filter your maps by.

{% hint style="warning" icon="list-check" %}

#### Prerequisites

You need Editor or Admin access in the workspace to create personas.
{% endhint %}

#### How to create a persona from scratch

Personas live at the workspace level. Create one from the **Personas** list in the workspace sidebar.

{% stepper %}
{% step %}
**Open Personas in your workspace**

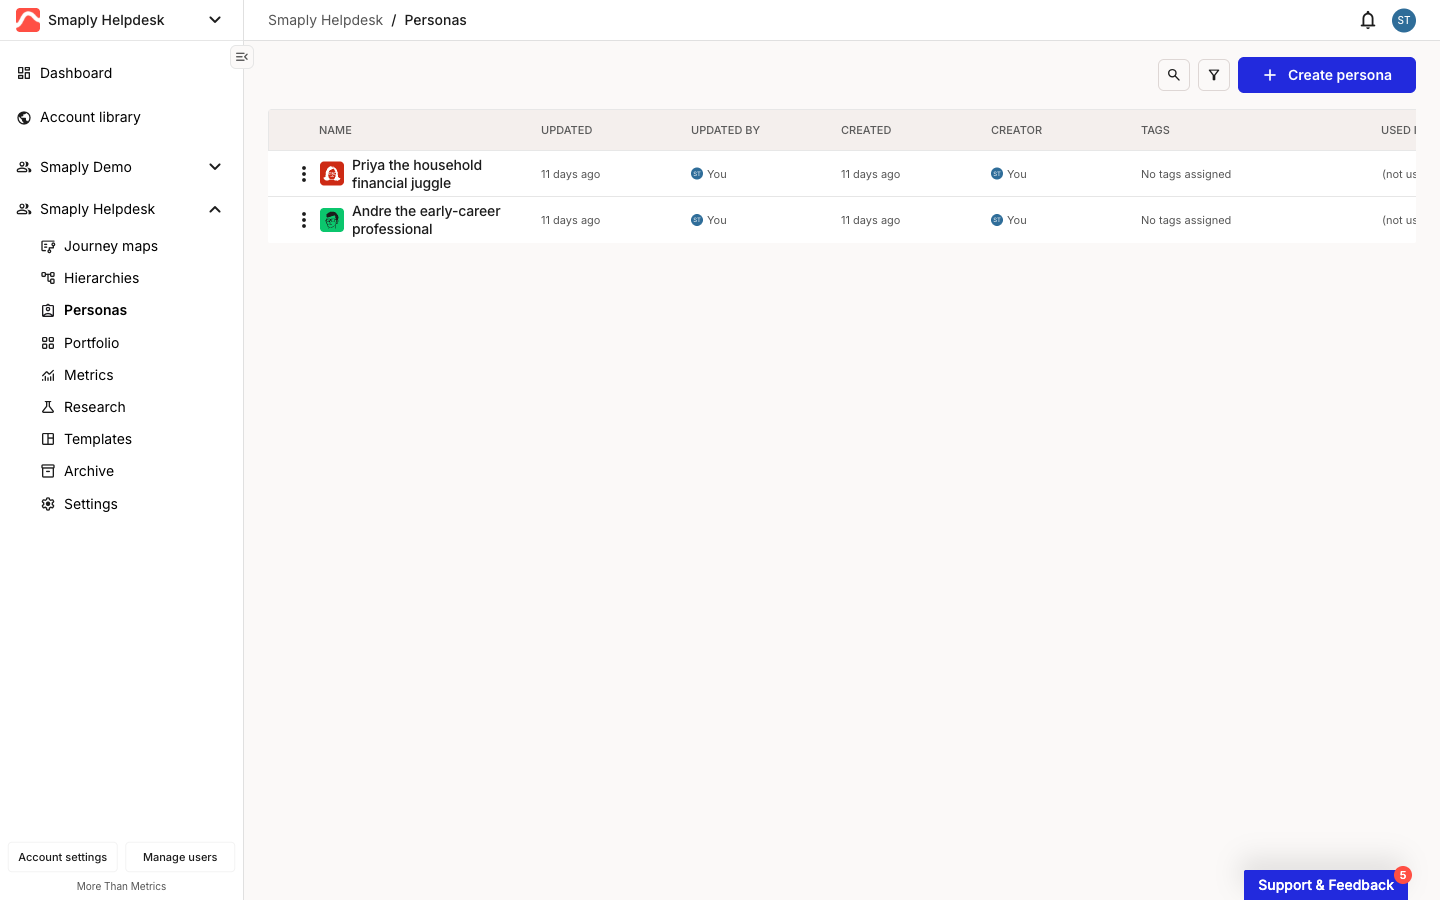
In the workspace sidebar, click **Personas**. The list shows every persona in the workspace.

<figure><img src="/files/wW8htpMqoEsJlcridP8t" alt="The Personas list in a workspace, showing two personas named &#x27;Priya the household financial juggle&#x27; and &#x27;Andre the early-career professional&#x27;, with columns for Name, Updated, Updated by, Created, Creator, Tags, and Used in. Personas is selected in the workspace sidebar. A + Create persona button sits in the top right."><figcaption><p>Workspace > Personas</p></figcaption></figure>
{% endstep %}

{% step %}
**Click + Create persona**

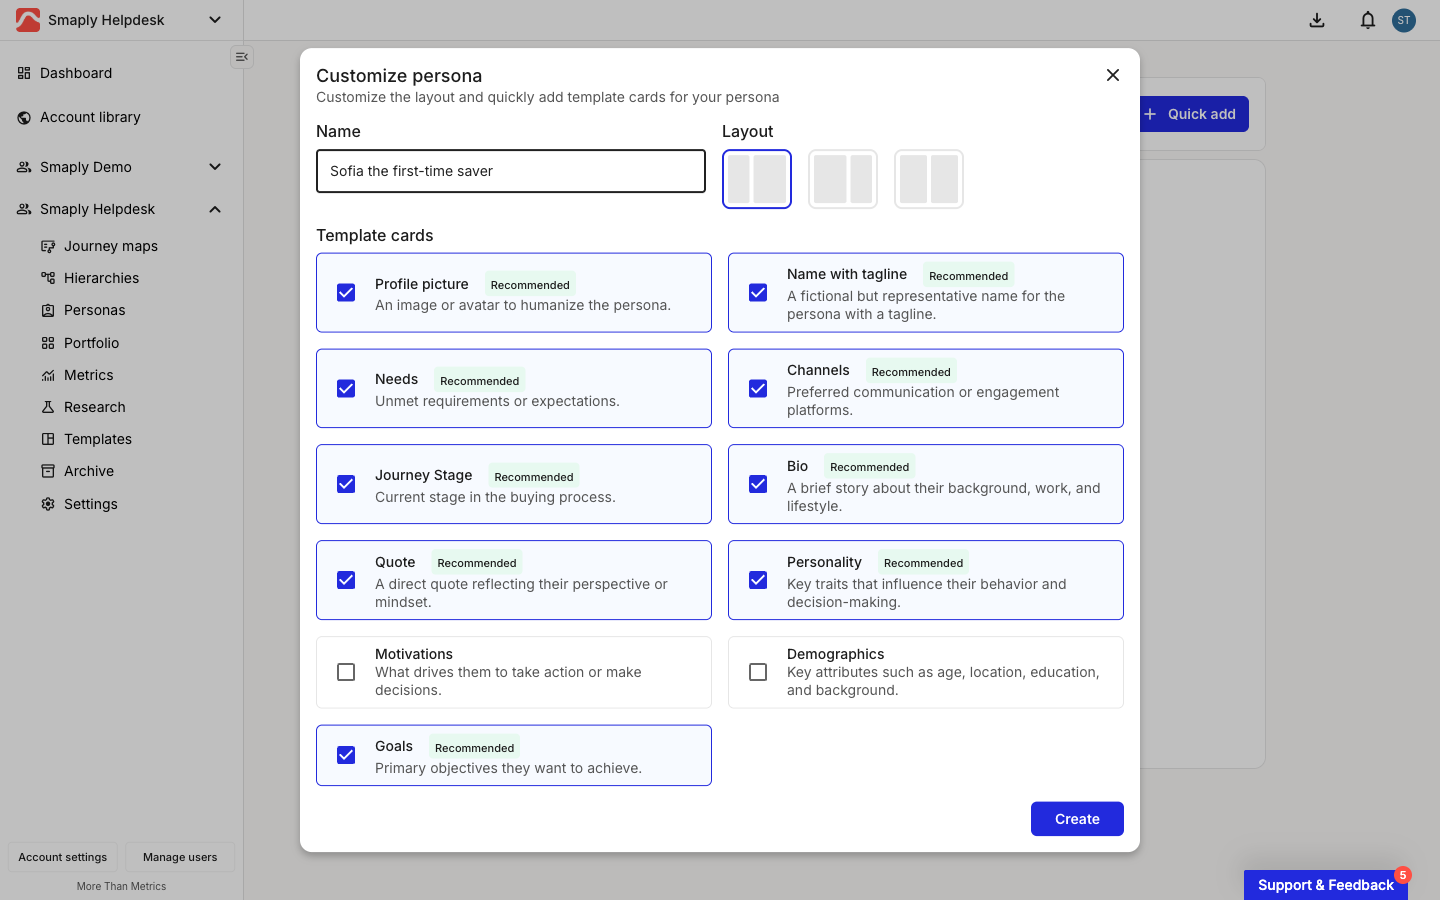
In the top right, click **+ Create persona**. The **Customize persona** modal opens with a suggested name, a layout picker, and the template card checklist.

<figure><img src="/files/4JH5ln10eHiapQfyykuX" alt="The Customize persona modal with &#x27;Sofia the first-time saver&#x27; in the Name field. The Layout section shows three layout options with the first selected. Below, Template cards are listed in a two-column grid: Profile picture, Name with tagline, Needs, Channels, Journey Stage, Bio, Quote, Personality, and Goals are checked and badged Recommended; Motivations and Demographics are unchecked. A Create button sits at the bottom right."><figcaption><p>Customize persona modal</p></figcaption></figure>
{% endstep %}

{% step %}
**Name the persona**

Type a name in the **Name** field, replacing the suggested one. A name your team will recognize reads better on a card than "Persona 1", so something like "Sofia the first-time saver" works well.
{% endstep %}

{% step %}
**Pick a layout**

Under **Layout**, choose how the persona page splits into two columns. All three are starting points; you can change the layout later from the editor.

* **Thin/Thick** - A narrow left column and a wide right column. Selected by default, and a good fit for short cards (image, name) on the left with longer-form content (bio, goals) on the right.
* **Equal/Equal** - Two columns of the same width.
* **Thick/Thin** - A wide left column and a narrow right column.
  {% endstep %}

{% step %}
**Choose your template cards**

Under **Template cards**, check the cards you want added to the new persona. The nine recommended cards are checked by default; uncheck any you don't need, or check **Motivations** and **Demographics** to include them.

See [What each template card covers](#what-each-template-card-covers) below for a description of each one.
{% endstep %}

{% step %}
**Click Create**

Click **Create** at the bottom right of the modal. Smaply opens the new persona in the full-page editor with your layout and template cards in place.
{% endstep %}

{% step %}
**Fill in the cards**

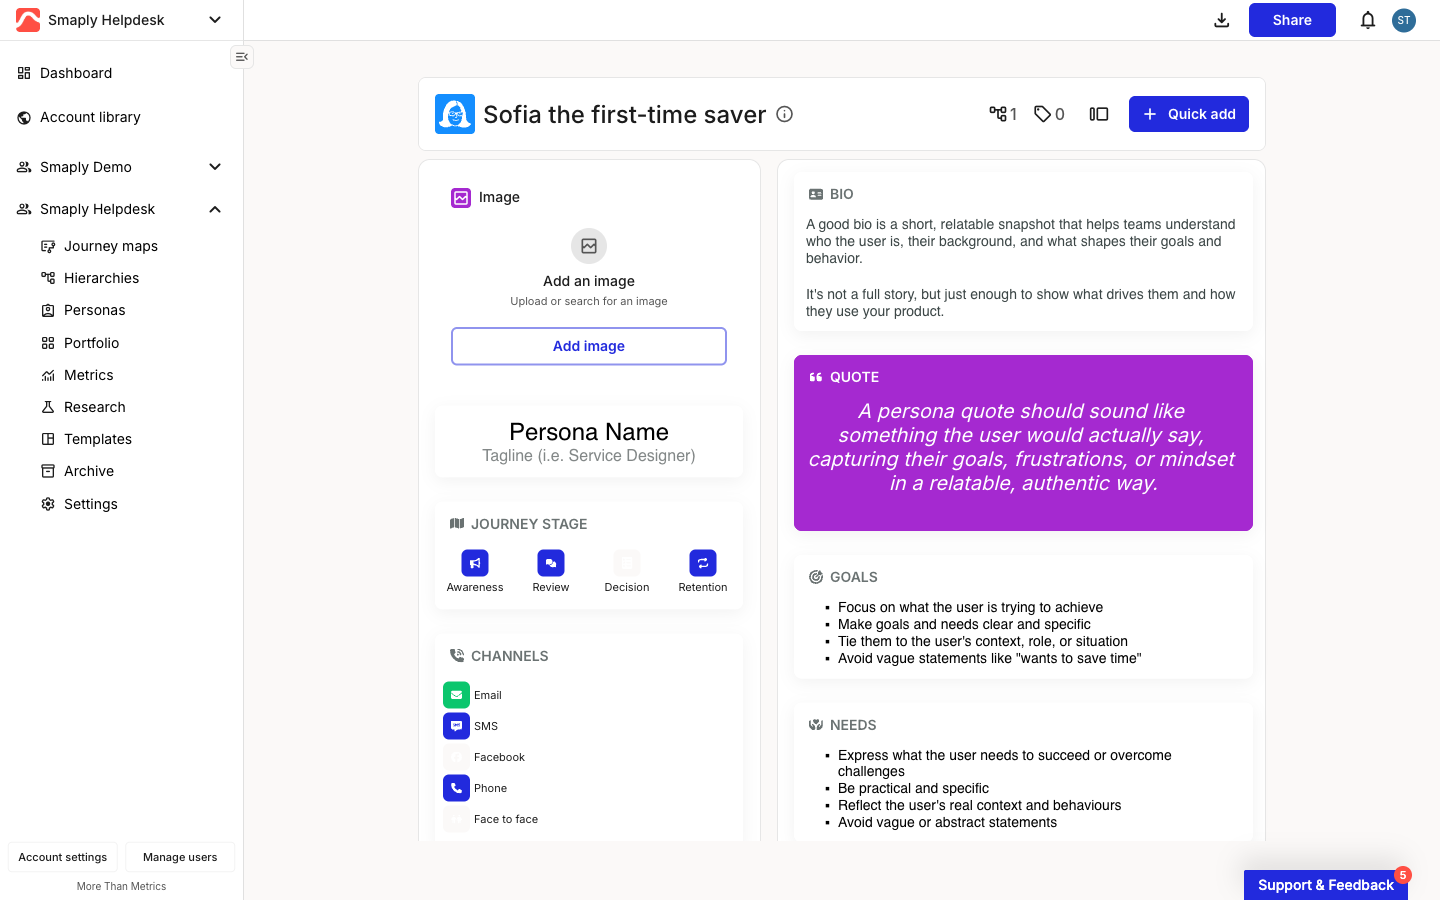
Click any card to add its content. Add a photo or avatar from the **Image** card with **Add image**, set the name and tagline on the name card (shown as "Persona Name" until you fill it in), drag the **Personality** slider, and write into **Bio**, **Quote**, and **Goals**. Changes save as you type.

Template cards aren't the only way to add content. Click **+ Quick add** in the header for more template cards, or use the card-type picker to add any supported card type: Image, Text, Slider, Icons, Embed, Metric, or Planning. See [How to edit a persona](/personas/how-to-edit-a-persona.md) for the full set of editing options.

<figure><img src="/files/Kb0FvMJLhf1OVMk5y1Ug" alt="The persona editor for &#x27;Sofia the first-time saver&#x27;. The header shows a colored persona icon, the name, an info icon, counters, a layout toggle, and a + Quick add button. The left column holds Image, Persona Name, Journey Stage, and Channels cards; the right column holds Bio, Quote, Personality, and Goals cards."><figcaption><p>Persona editor, ready to fill in</p></figcaption></figure>
{% endstep %}
{% endstepper %}

{% hint style="info" icon="compass" %}
You can also create a persona while working in a journey map. Open a card, and in its **Personas** section click **+ Create new persona**. See [How to assign a persona to a card](/personas/how-to-assign-a-persona-to-a-card.md).
{% endhint %}

***

#### What each template card covers

Template cards are pre-built sections Smaply can drop into a new persona so you start with structure instead of a blank page. Nine arrive checked (badged **Recommended**); the last two are off by default.

| Template card     | What it holds                                                   | Pre-selected                        |
| ----------------- | --------------------------------------------------------------- | ----------------------------------- |
| Profile picture   | An image or avatar to humanize the persona                      | <i class="fa-check">:check:</i> Yes |
| Name with tagline | A fictional but representative name with a tagline              | <i class="fa-check">:check:</i> Yes |
| Needs             | Unmet requirements or expectations                              | <i class="fa-check">:check:</i> Yes |
| Channels          | Preferred communication or engagement platforms                 | <i class="fa-check">:check:</i> Yes |
| Journey Stage     | Current stage in the buying process                             | <i class="fa-check">:check:</i> Yes |
| Bio               | A brief story about their background, work, and lifestyle       | <i class="fa-check">:check:</i> Yes |
| Quote             | A direct quote reflecting their perspective or mindset          | <i class="fa-check">:check:</i> Yes |
| Personality       | Key traits that influence their behavior and decision-making    | <i class="fa-check">:check:</i> Yes |
| Goals             | Primary objectives they want to achieve                         | <i class="fa-check">:check:</i> Yes |
| Motivations       | What drives them to take action or make decisions               | <i class="fa-xmark">:xmark:</i> No  |
| Demographics      | Key attributes such as age, location, education, and background | <i class="fa-xmark">:xmark:</i> No  |

You don't have to settle the full set at creation. Anything you skip is one click away later from **+ Quick add** in the editor.

***

#### What happens after you create a persona

The persona lands in the workspace **Personas** list and is ready to use wherever personas appear:

* Assign it to journey map cards so each card shows which persona it applies to. See [How to assign a persona to a card](/personas/how-to-assign-a-persona-to-a-card.md).
* Filter a journey map by persona to focus a map on one persona's experience. See [How to filter a journey map by persona](/personas/how-to-filter-a-journey-map-by-persona.md).
* Use it as a line in an emotion chart lane to plot that persona's sentiment across the journey.

***

#### Related topics

<table data-column-title-hidden data-view="cards"><thead><tr><th>Title</th><th>Description</th><th data-hidden data-card-target data-type="content-ref">Target</th></tr></thead><tbody><tr><td><strong>Assign a persona to a card</strong></td><td>Tag specific cards on a journey map with one or more personas.</td><td><a href="/pages/42b6nVolnvr4VE3kfJ6s">/pages/42b6nVolnvr4VE3kfJ6s</a></td></tr><tr><td><strong>Filter a map by personas</strong></td><td>Narrow a journey map to the cards relevant to one persona at a time.</td><td><a href="/pages/zxwopszZeIAP89VtDjFI">/pages/zxwopszZeIAP89VtDjFI</a></td></tr><tr><td><strong>Create a journey map</strong></td><td>Start a new journey map with Smaply AI, from scratch, or from a template.</td><td><a href="/pages/LfyJzQKJ0Sv9rMnQYKEQ">/pages/LfyJzQKJ0Sv9rMnQYKEQ</a></td></tr></tbody></table>


---

# Agent Instructions
This documentation is published with GitBook. GitBook is the documentation platform designed so that both humans and AI agents can read, navigate, and reason over technical content effectively. Learn more at gitbook.com.

## Querying This Documentation
If you need additional information that is not directly available in this page, you can query the documentation dynamically by asking a question.

Perform an HTTP GET request on the current page URL with the `ask` query parameter, and the optional `goal` query parameter:

```
GET https://helpdesk.smaply.app/personas/how-to-create-a-persona.md?ask=<question>&goal=<endgoal>
```

`ask` is the immediate question: it should be specific, self-contained, and written in natural language.
`goal` is optional and describes the broader end goal you are ultimately trying to accomplish on behalf of the user. GitBook uses it to tailor the answer towards what is most useful for that goal.

The response will contain a direct answer to the question and relevant excerpts and sources from the documentation.

Use this mechanism when the answer is not explicitly present in the current page, you need clarification or additional context, or you want to retrieve related documentation sections.