> For the complete documentation index, see [llms.txt](https://helpdesk.smaply.app/llms.txt). Markdown versions of documentation pages are available by appending `.md` to page URLs; this page is available as [Markdown](https://helpdesk.smaply.app/personas/how-to-manage-personas.md).

# How to manage personas

Everything you do to a persona after it exists lives on the **Personas** list: sort the list, make copies, share a persona across workspaces or with a public link, archive one for later, or delete it for good. Work on a single persona from its row menu, or tick several and act on them at once.

{% hint style="info" icon="clipboard-list" %}

#### In this guide

1. [The Personas list](#the-personas-list)
2. [Duplicate a persona](#duplicate-a-persona)
3. [Add a persona to the Account Library](#add-a-persona-to-the-account-library)
4. [Archive and restore a persona](#archive-and-restore-a-persona)
5. [Delete a persona](#delete-a-persona)
6. [Act on several personas at once](#act-on-several-personas-at-once)
   {% endhint %}

#### The Personas list

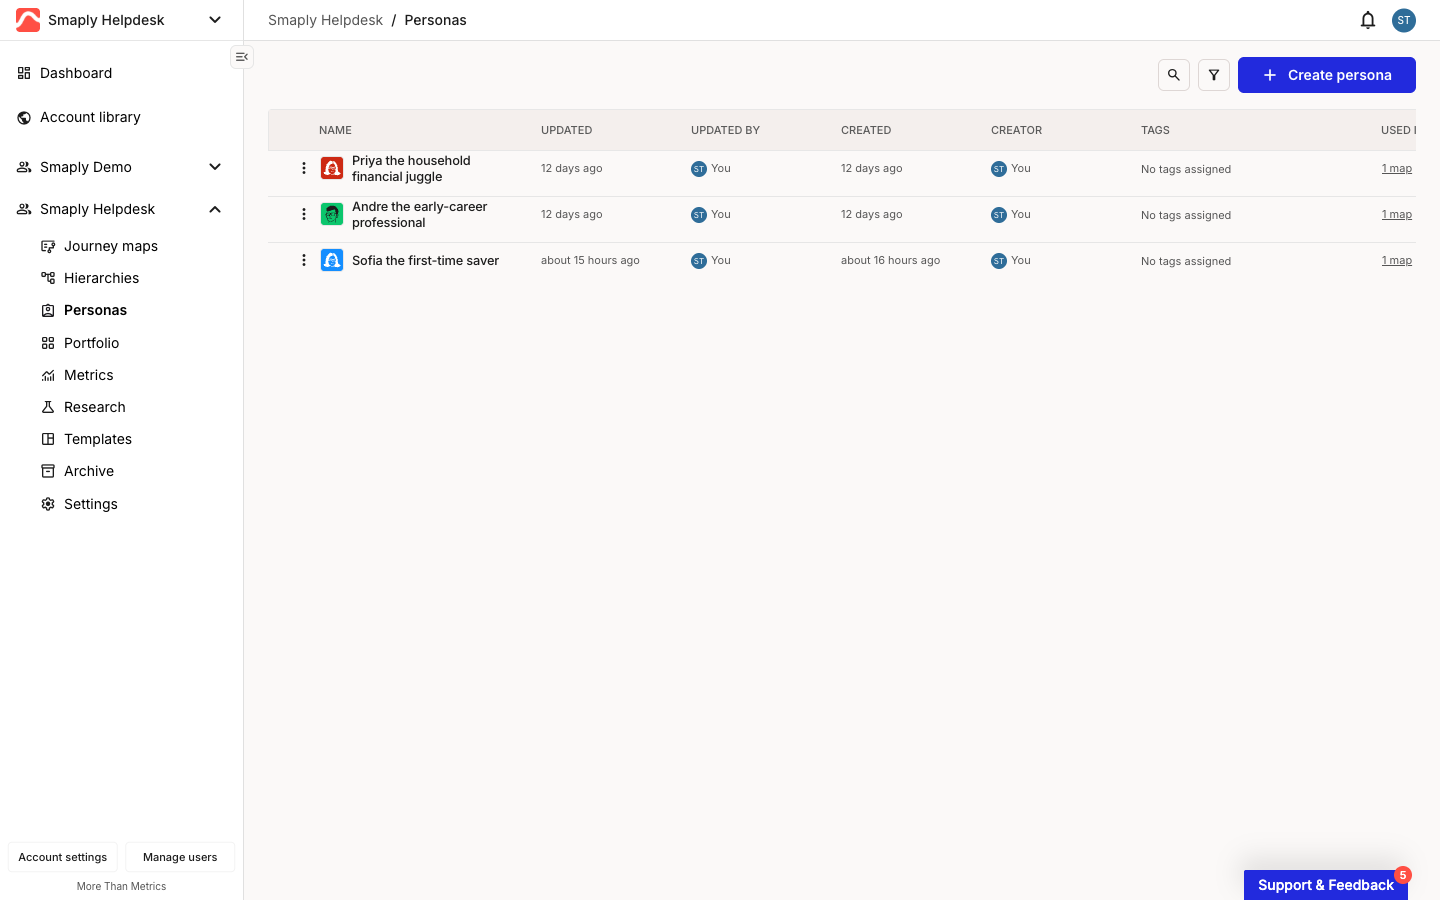
Open it from **Personas** in the workspace sidebar. Each persona is a row, sorted and searchable across these columns:

* **Name** - the persona icon and name.
* **Updated** / **Updated by** - when the persona last changed and who changed it.
* **Created** / **Creator** - when it was made and who made it.
* **Tags** - any tags applied, with a **+N** indicator when there are more than fit.
* **Used in** - how many journey maps the persona is assigned to. A used persona shows a link like **1 map** that opens those maps; an unused one shows **(not used)**.

<figure><img src="/files/2ZWmm3duP8AY91NgFGUo" alt="The Personas list page in a workspace, showing three personas as rows with columns for Name, Updated, Updated by, Created, Creator, Tags, and Used in. A search icon, filter icon, and a + Create persona button sit above the table. Each row has a checkbox and a three-dot menu."><figcaption><p>Workspace sidebar > Personas</p></figcaption></figure>

Click any column heading to sort by it. Use the search and filter icons above the table to narrow a long list. Everything you can do to a single persona is in its three-dot menu at the start of the row.

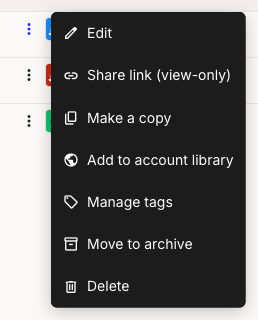
<figure><img src="/files/A2KUN3kMdnKoDw9P6YHz" alt="An open three-dot row menu on the Personas list with seven actions in order: Edit, Share link (view-only), Make a copy, Add to account library, Manage tags, Move to archive, Delete."><figcaption><p>The row three-dot menu</p></figcaption></figure>

* **Edit** opens the persona in the editor. See [How to edit a persona](/personas/how-to-edit-a-persona.md) for changing its cards, layout, icon, and name.
* **Share link (view-only)** creates a read-only public link to the persona, with optional password protection. See [How to share or export a persona](/sharing-and-exporting/how-to-share-or-export-a-persona.md).
* **Make a copy** duplicates the persona in this workspace (covered below).
* **Add to account library** shares it across workspaces (covered below).
* **Manage tags** applies existing tags to the persona. To create or rename tags, see [How to create and edit tags](/account-and-team/tags/how-to-create-and-edit-tags.md).
* **Move to archive** sets it aside without deleting it (covered below).
* **Delete** removes it permanently (covered below).

***

#### Duplicate a persona

To copy a persona within the same workspace, open its three-dot menu and click **Make a copy**. The duplicate appears in the list as a separate persona you can rename and edit on its own. The original is untouched, and the copy carries no journey map assignments of its own.

To put the same persona in a *different* workspace, share it through the Account Library instead.

***

#### Add a persona to the Account Library

The Account Library is a shared layer that makes a persona available across every workspace in your account. From a persona's three-dot menu, click **Add to account library**. The persona stays in this workspace and becomes reusable in the others.

{% hint style="info" icon="tag" %}

#### Plan availability

The Account Library is available on the **Framework** and **Governance** plans and activates once your account has two or more workspaces. With a single workspace, **Add to account library** has nothing to share into and won't apply.
{% endhint %}

For how shared items behave once they're in the library, see [How to use the Account Library](/account-and-team/how-to-use-the-account-library.md).

***

#### Archive and restore a persona

Archiving sets a persona aside without deleting it. It leaves the active list but stays fully recoverable, which makes it the safe choice when you might want the persona back.

{% stepper %}
{% step %}
**Move the persona to the archive**

On the persona's row, open the three-dot menu and click **Move to archive**. Confirm in the dialog by clicking **Yes, move to archive**.
{% endstep %}

{% step %}
**Open the Archive and switch to Personas**

Click **Archive** in the workspace sidebar. The archive opens on Journey maps by default, with a row of categories across the top. Click **Personas** to see your archived personas.

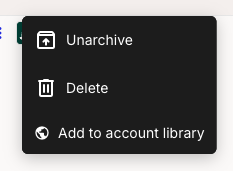
<figure><img src="/files/PkjxVzn3cLIKi5ztfCpg" alt="The workspace Archive view filtered to the Personas category. An archived persona row has its three-dot menu open, showing only three actions: Unarchive, Delete, and Add to account library."><figcaption><p>Archive > Personas</p></figcaption></figure>
{% endstep %}

{% step %}
**Restore it**

Open the archived persona's three-dot menu and click **Unarchive**. It returns to the active Personas list. An archived persona's menu only offers **Unarchive**, **Delete**, and **Add to account library**, so edit it after you've brought it back.
{% endstep %}
{% endstepper %}

***

#### Delete a persona

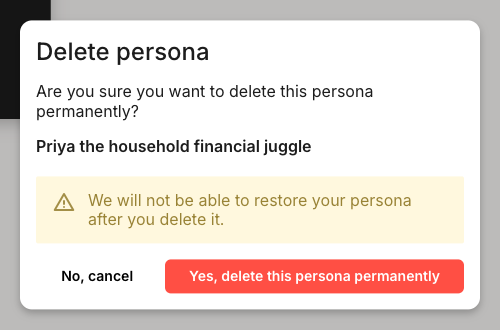
To remove a persona for good, open its three-dot menu and click **Delete**. The confirmation dialog (**Delete persona**) names the persona and warns that it can't be restored. Click **Yes, delete this persona permanently** to confirm, or **No, cancel** to back out.

<figure><img src="/files/pBlhLYeIfFdrpCgzybmE" alt="The Delete persona confirmation dialog. It asks &#x27;Are you sure you want to delete this persona permanently?&#x27;, shows the persona name in bold, and a yellow warning reads &#x27;We will not be able to restore your persona after you delete it.&#x27; Buttons: No, cancel and Yes, delete this persona permanently."><figcaption><p>Delete persona confirmation</p></figcaption></figure>

{% hint style="danger" %}

#### **Warning: Deleting a persona is permanent and un-assigns it from every card**

There's no recovery. If the persona is assigned to cards in any journey map, deleting it silently removes that assignment from every card. The cards themselves stay in place and no notification appears on the affected maps. To keep the persona instead, use **Move to archive**.
{% endhint %}

***

#### Act on several personas at once

Tick the checkbox on two or more rows to bring up the bulk action bar, headed **Bulk edit · N items**. Close it with the **X** to clear your selection.

<figure><img src="/files/htC9L5KGsYBSkOhZFUfr" alt="The bulk action bar shown after selecting two personas. It reads &#x27;Bulk edit 2 items&#x27; with a close control, then four actions: Add to account library, Remove from account library (greyed out), Archive, and Delete."><figcaption><p>Bulk action bar, two personas selected</p></figcaption></figure>

The bar applies one action to the whole selection:

* **Add to account library** - shares all selected personas across workspaces (same plan and workspace requirement as the single-persona action above).
* **Remove from account library** - takes them back out of the library. It's greyed out unless the selection is already in the library.
* **Archive** - moves them all to the archive, where you can restore them later.
* **Delete** - removes them all permanently, with the same consequence as deleting one: any card assignments are silently dropped and can't be recovered.

#### Related topics

<table data-column-title-hidden data-view="cards"><thead><tr><th>Article</th><th>What it covers</th><th data-hidden data-card-target data-type="content-ref">Target</th></tr></thead><tbody><tr><td><strong>How to create a persona</strong></td><td>Add a new persona from the list and fill its cards.</td><td><a href="/pages/q92JEZ67HauDof23i4mL">/pages/q92JEZ67HauDof23i4mL</a></td></tr><tr><td><strong>How to edit a persona</strong></td><td>Change a persona's cards, layout, icon, and name in the editor.</td><td><a href="/pages/QSksmHh3bfnMcEMGSGYE">/pages/QSksmHh3bfnMcEMGSGYE</a></td></tr><tr><td><strong>How to assign a persona to a card</strong></td><td>Attach personas to journey map cards, one or several at a time.</td><td><a href="/pages/42b6nVolnvr4VE3kfJ6s">/pages/42b6nVolnvr4VE3kfJ6s</a></td></tr><tr><td><strong>How to share or export a persona</strong></td><td>Create a read-only public link to a persona, or export it as a PDF.</td><td><a href="/pages/FJ6yN3C95BvKbdxz2fx1">/pages/FJ6yN3C95BvKbdxz2fx1</a></td></tr><tr><td><strong>How to use the Account Library</strong></td><td>Share and manage content across all workspaces in your account.</td><td><a href="/pages/1xJR8wxOSmPbsGgxwtjR">/pages/1xJR8wxOSmPbsGgxwtjR</a></td></tr></tbody></table>


---

# Agent Instructions
This documentation is published with GitBook. GitBook is the documentation platform designed so that both humans and AI agents can read, navigate, and reason over technical content effectively. Learn more at gitbook.com.

## Querying This Documentation
If you need additional information that is not directly available in this page, you can query the documentation dynamically by asking a question.

Perform an HTTP GET request on the current page URL with the `ask` query parameter, and the optional `goal` query parameter:

```
GET https://helpdesk.smaply.app/personas/how-to-manage-personas.md?ask=<question>&goal=<endgoal>
```

`ask` is the immediate question: it should be specific, self-contained, and written in natural language.
`goal` is optional and describes the broader end goal you are ultimately trying to accomplish on behalf of the user. GitBook uses it to tailor the answer towards what is most useful for that goal.

The response will contain a direct answer to the question and relevant excerpts and sources from the documentation.

Use this mechanism when the answer is not explicitly present in the current page, you need clarification or additional context, or you want to retrieve related documentation sections.