> For the complete documentation index, see [llms.txt](https://helpdesk.smaply.app/llms.txt). Markdown versions of documentation pages are available by appending `.md` to page URLs; this page is available as [Markdown](https://helpdesk.smaply.app/portfolio/how-to-create-custom-portfolio-item-types.md).

# How to create custom portfolio item types

Beyond the built-in pain points, opportunities, and solutions, you can define your own portfolio item types with their own icon, scoring, and statuses. Set one up once at the account level and it works on every journey map, exactly like the built-in types.

{% hint style="warning" icon="list-check" %}

#### Prerequisites

You're an Admin at the account level. Custom types live in Account Settings, which only Admins can open.
{% endhint %}

#### Where custom item types live

Custom types are managed in **Account Settings > Customization**, on the **Custom cards** sub-tab. The list shows every type in your account: the built-in **Opportunity**, **Pain point**, and **Solution** (which you can edit but not delete), plus any custom types you've added.

<figure><img src="/files/h2c2xiuQO936kBLu6sTW" alt="The Customization tab in Account settings with the Custom cards sub-tab open. A list shows Opportunity, Pain point, Solution, and a custom Goals type, each with an Edit link. A + New custom card button sits below the list, with a 4 of 8 used counter to its right."><figcaption><p>Account Settings > Customization > Custom cards</p></figcaption></figure>

{% hint style="info" %}
An account can have up to 8 portfolio item types in total: the 3 built-in types plus up to 5 custom ones. The **N of 8 used** counter next to **+ New custom card** tracks how many you've used.
{% endhint %}

***

#### How to create a custom card type

Each custom type carries the same example through the steps below: a **Risk** type for tracking risks across journeys.

{% stepper %}
{% step %}
**Open the new card dialog**

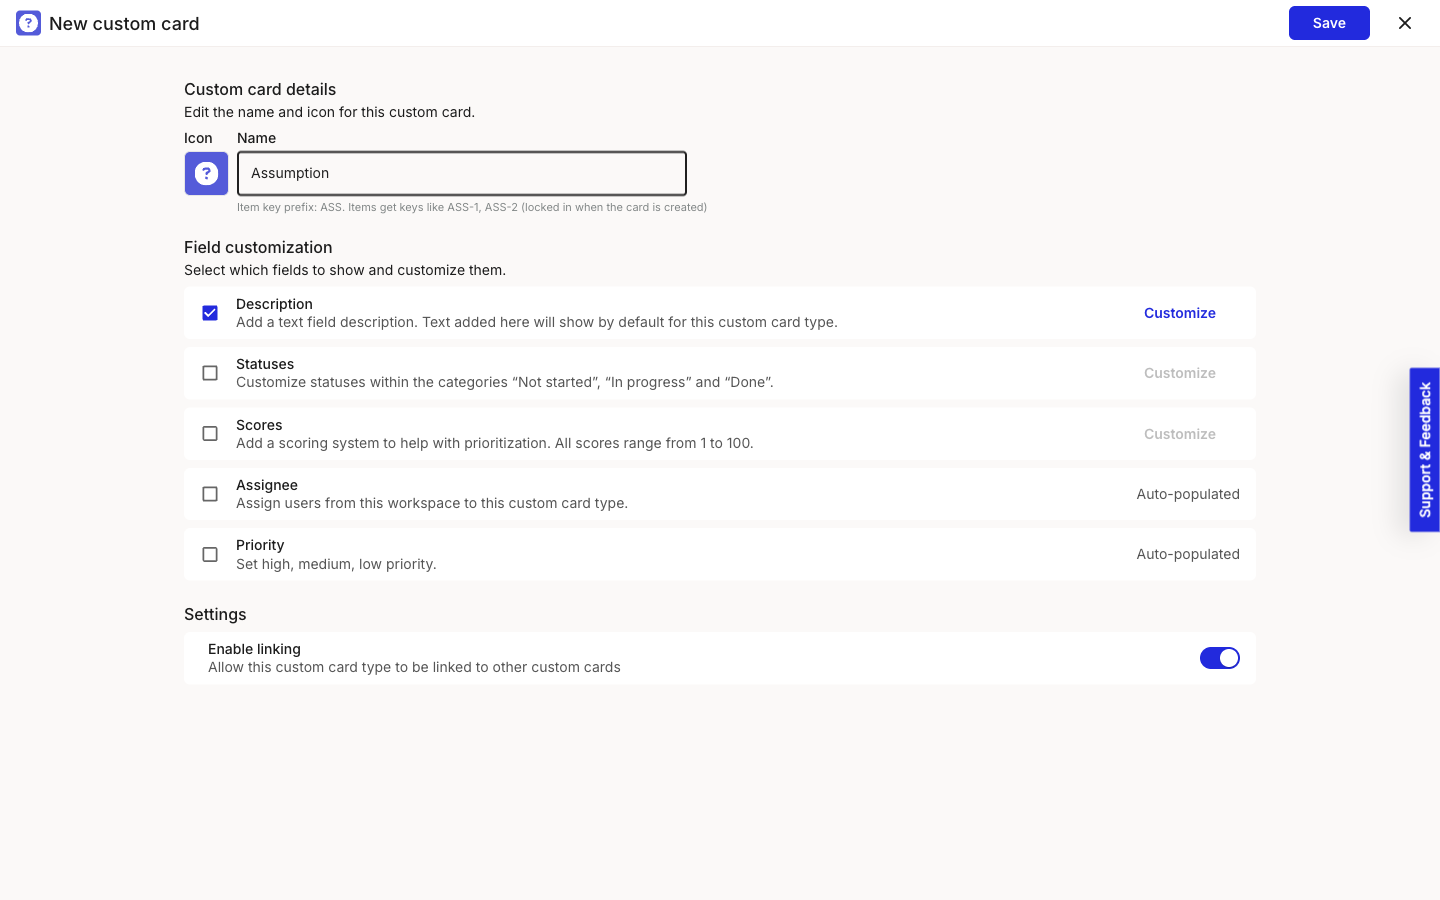
Click **+ New custom card**. A full-page dialog opens with the type's settings.

<figure><img src="/files/JQzMKDL440izn7Hem2jE" alt="The New custom card full-page dialog, empty. A Custom card details section has an Icon picker and a Name field. A Field customization section lists Description (checked), Statuses, Scores, Assignee, and Priority. A Settings section has an Enable linking toggle, switched on. The Save button at the top right is disabled."><figcaption><p>New custom card, empty</p></figcaption></figure>
{% endstep %}

{% step %}
**Name the type and pick an icon**

Under **Custom card details**, enter a **Name** (here, *Risk*) and choose an **Icon**. The icon and color are how the type appears on cards, in the views, and in the chart legend. **Save** stays disabled until the type has a name.
{% endstep %}

{% step %}
**Choose which fields the type has**

Under **Field customization**, turn on the fields this type should carry. **Description** is on by default; **Statuses** and **Scores** are off until you turn them on. **Assignee** and **Priority** are marked **Auto-populated**, so they work without any setup. Leave **Enable linking** on under **Settings** if you want items of this type to link to other items.

<figure><img src="/files/0m7z6NzLgfJSlO2CfXvK" alt="The New custom card dialog with Name set to Risk and Description, Statuses, and Scores all checked in the Field customization list. Each checked field shows a blue Customize link. The Save button is now active."><figcaption><p>New custom card, Risk with fields selected</p></figcaption></figure>
{% endstep %}

{% step %}
**Customize the scoring model**

Next to **Scores**, click **Customize**. A type has three score dimensions, labelled **A**, **B**, and **C**, each with a name you can edit and each scored from 1 to 100. The names are yours to set; this example uses *Impact*, *Feasibility*, and *Potential*.

These three dimensions drive the prioritization chart: **A** is the vertical axis, **B** is the horizontal axis, and **C** is the bubble size. Click **Save** to return to the type.

<figure><img src="/files/7iKddXKdWRalwXDgmN80" alt="The Customize scores dialog with three editable label fields A, B, and C set to Impact, Feasibility, and Potential. A Prioritization chart explained panel below shows A as the vertical axis, B as the horizontal axis, and C as the circle size."><figcaption><p>Customize scores</p></figcaption></figure>
{% endstep %}

{% step %}
**Customize the statuses**

Next to **Statuses**, click **Customize**. Statuses sit in three fixed categories: **Not Started**, **In Progress**, and **Done**. To add, rename, reorder, or delete the individual statuses inside a category, click **Add / edit statuses** on that row.

<figure><img src="/files/pgQ5l6aEhaF2MsvO1K29" alt="The Customize statuses dialog showing three category rows: Not Started, In Progress, and Done. Each row lists its current statuses and an Add / edit statuses link. The Done category contains two statuses, Done and Canceled."><figcaption><p>Customize statuses</p></figcaption></figure>

In **Edit Statuses**, drag the handle to reorder a status, edit its name in place, or use the trash icon to remove it. **Add status** adds a new one to the category. Click **Save** to return.

<figure><img src="/files/mkbT6kCxaQ2sCrWJJmEZ" alt="The Edit Statuses dialog for the Not Started category. A single status row shows a drag handle, a color dot, an editable name field reading Not Started, and a delete icon. An Add status link sits below it, with Cancel and Save buttons."><figcaption><p>Edit Statuses, Not Started category</p></figcaption></figure>
{% endstep %}

{% step %}
**Save the type**

Click **Save** in the dialog header. The type appears in the **Custom cards** list and the **N of 8 used** counter goes up by one. Anyone in your workspaces can now create items of this type, and add them to journey maps as cards, the same way they would an opportunity or a pain point.
{% endstep %}
{% endstepper %}

***

#### How to edit a type or rename a score dimension

To change a type later, click **Edit** on its row in the **Custom cards** list. The same dialog opens, and you can rename the type, swap its icon, toggle fields, or reopen **Customize scores** and **Customize statuses**.

Two behaviours are worth knowing before you edit a type that already has items:

* Renaming a score dimension takes effect immediately, on every existing item of that type and every card that displays them.
* Structural changes, like adding or removing a field such as a status or a score, apply to existing items as well as new ones. Content does not backfill, though: if you add a default description, items created before the change keep their own.

#### How to delete a custom card type

Deleting a type removes far more than the type itself, so do this only when you're sure no items of that type are still needed.

To delete, click the trash icon on the type's row. The built-in types cannot be deleted, so the icon is only active on custom types. A **Confirm deletion** dialog explains what will happen.

<figure><img src="/files/sQmjWmvT5HuDOgVDOwNQ" alt="The Confirm deletion dialog for the Risk type. A warning explains that deleting the Risk custom card type will delete all Risk items from journey maps and the account, and that connected cards will be shown as an error on the maps where they are used. The dialog asks Are you sure you want to continue, with No, go back and a red Delete button."><figcaption><p>Confirm deletion</p></figcaption></figure>

{% hint style="danger" %}

#### **Warning: Deleting a type deletes every item of that type**

Confirming removes every item of the type from your account and your journey maps. Any card that showed one of those items is left in an error state on the maps where it was used. Click **No, go back** to keep the type; click **Delete** only if you want this cascade.
{% endhint %}

#### Related topics

<table data-column-title-hidden data-view="cards"><thead><tr><th>Article</th><th>What it covers</th><th data-hidden data-card-target data-type="content-ref">Target</th></tr></thead><tbody><tr><td><strong>Create a portfolio item</strong></td><td>Add an item of any type, including your custom types, from the Portfolio area.</td><td><a href="/pages/ccKByq3EkMP6r9UQIneW">/pages/ccKByq3EkMP6r9UQIneW</a></td></tr><tr><td><strong>Use the portfolio chart</strong></td><td>Read items as bubbles positioned by the score dimensions you set here.</td><td><a href="/pages/Bvvajkxb89h2CT9fR2mF">/pages/Bvvajkxb89h2CT9fR2mF</a></td></tr><tr><td><strong>Use the portfolio table</strong></td><td>Sort, filter, and export your items across every type.</td><td><a href="/pages/Mz77ioM4nJgfxggwyXja">/pages/Mz77ioM4nJgfxggwyXja</a></td></tr><tr><td><strong>Link portfolio items</strong></td><td>Connect items to each other, like a pain point to its solution.</td><td><a href="/pages/iDGXQS6w1CP6Vkc7j5BA">/pages/iDGXQS6w1CP6Vkc7j5BA</a></td></tr><tr><td><strong>Add evidence to a portfolio item</strong></td><td>Back an item with research quotes and manually entered evidence.</td><td><a href="/pages/M7pLmvLqe5OLNTD1V9B1">/pages/M7pLmvLqe5OLNTD1V9B1</a></td></tr></tbody></table>


---

# Agent Instructions
This documentation is published with GitBook. GitBook is the documentation platform designed so that both humans and AI agents can read, navigate, and reason over technical content effectively. Learn more at gitbook.com.

## Querying This Documentation
If you need additional information that is not directly available in this page, you can query the documentation dynamically by asking a question.

Perform an HTTP GET request on the current page URL with the `ask` query parameter, and the optional `goal` query parameter:

```
GET https://helpdesk.smaply.app/portfolio/how-to-create-custom-portfolio-item-types.md?ask=<question>&goal=<endgoal>
```

`ask` is the immediate question: it should be specific, self-contained, and written in natural language.
`goal` is optional and describes the broader end goal you are ultimately trying to accomplish on behalf of the user. GitBook uses it to tailor the answer towards what is most useful for that goal.

The response will contain a direct answer to the question and relevant excerpts and sources from the documentation.

Use this mechanism when the answer is not explicitly present in the current page, you need clarification or additional context, or you want to retrieve related documentation sections.