For the complete documentation index, see llms.txt. This page is also available as Markdown.

How to share a saved view

Share one filtered perspective of a journey map as a view-only link, without giving people access to the full map.

Each saved view gets its own view-only link, separate from the full-map link. Turn on the link for a single filtered perspective, copy it, and send it to anyone, no Smaply account needed on their end.

Prerequisites

Plan availability

Saved views are available on the Repository plan and above, so per-view sharing is too. The view-only link itself works on every plan.

Apply the view first so the Share panel knows which perspective to link. The panel title names the active view, which is how you confirm you're sharing the right one.

1

Apply the saved view

Open the Views menu above the map and select the view you want to share. The map filters to that view and the Views toggle relabels to the view's name.

2

Open the Share menu

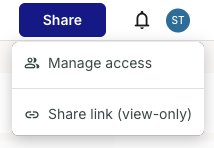
Click Share in the top-right corner of the editor, then select Share link (view-only).

The Share dropdown in the top-right of the journey map editor, showing Manage access and Share link (view-only).
Share > Share link (view-only)
3

Enable the link

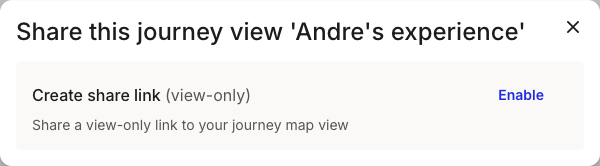
The panel opens titled Share this journey view '[view name]'. Click Enable next to Create share link (view-only) to generate the link.

The share panel for a saved view, titled Share this journey view, with a Create share link (view-only) row and an Enable action.
The per-view share panel, before enabling
4

Copy the link

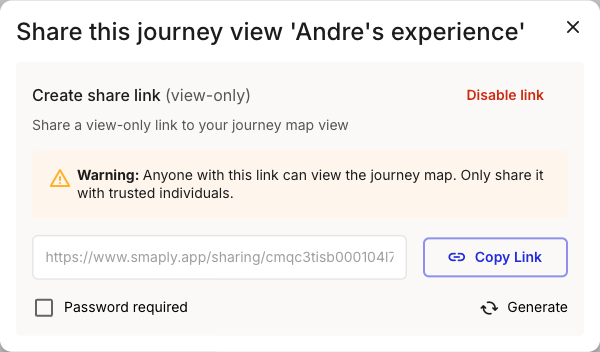
Click Copy Link to copy the generated URL, which sits on https://www.smaply.app/sharing/. Anyone who opens it sees a read-only version of the map with this view's filter already applied. They don't need a Smaply account.

The enabled per-view share panel showing a smaply.app/sharing link, a Copy Link button, a Disable link toggle, a Password required checkbox, and a Generate button.
The link is live and ready to copy

The shared page mirrors the editor and updates live as you change the map. It is not a snapshot, so viewers always see the current state. No view counts or visitor data are tracked on the link.


In the share panel, tick Password required, then click Generate for a password or type your own. A password needs at least 8 characters using a mix of letters, numbers, and symbols. Use the copy icon to save it, and send it to viewers separately from the link.

Password protection is available on the Framework plan and above.

Important: Copy the password before you close the panel

Click Disable link in the share panel. Access is revoked immediately. The toggle is independent per view, so disabling one view's link leaves the full-map link and any other views' links untouched.

Important: Re-enabling creates a new URL


How sharing a view differs from sharing the full map

The Share dropdown is the same with or without a view applied. What changes is the result: with a view applied, Share link (view-only) produces a link scoped to that view's filter; with no view applied, it shares the whole map. Each link is a separate URL with its own on/off toggle.

For a link to the complete, unfiltered map, see How to share a journey map via HTML link.

Last updated