Smaply Helpdesk
  • WELCOME
  • Getting Started
    • Sign up for a free account
    • Join by invitation
    • Switching between accounts
    • First steps in Smaply
    • Smaply: a visual walkthrough
  • Journey map editor
    • Editor features
      • Lanes, columns and cards
      • Filters and views
    • Exporting journey maps
    • Keyboard shortcuts
    • Enhanced pasting functionality
    • Share journey maps
      • Invite users directly to journeys
      • HTML sharing of journey maps
  • Dashboard
    • Dashboard
    • Table actions
      • Filtering in dashboard lists
      • Saved views
      • Bulk actions
      • Copy assets across workspaces
    • Personas
    • Templates
  • Portfolio
    • Opportunities, pain points, solutions
    • Portfolio matrix
  • Integrations
    • Metrics tools
      • Office 365 Excel
        • Configuring the Office 365 Excel integration
          • Setup service account for O365 Excel
          • Setup O365 Excel using Microsoft account (oAuth)
        • Using the O365 Excel integration in a metric
      • Google Analytics
        • Configuring the Google Analytics integration
        • Creating Google Service Account
        • OAuth Authentication for Google Analytics
        • Service account troubleshooting
      • PowerBI
        • Configuring the PowerBi Integration
          • Set up Service Account for PowerBI
            • Troubleshooting powerbi service account setup
          • Set up PowerBi using Microsoft account (OAuth)
        • Using the Power BI integration in a Metric
        • Getting up and running with PowerBI
    • Planning tools
      • Trello
        • Configure Trello with an api key
      • Asana
        • Configuring Asana using a Personal access token
      • Azure DevOps
        • Configuring Azure Devops with a personal token
      • Linear
        • Configuring Linear with Personal API key
      • Jira
        • Configuring JIRA with an api key
    • Embedding external content
  • Metrics
    • Introduction to metrics
    • Types of metrics
      • Series metrics
        • Create a series metric
      • Number metrics
        • Create a number metric
      • Comparison metrics
        • Create a comparison metric
    • Setting up metrics
  • Planning Items
    • Planning item overview
    • Adding a planning item
  • Account settings
    • Upgrade, downgrade or delete your account
    • Access levels and permissions
    • User management
    • Taxonomy
    • Tags
  • Learning resources
    • Video tutorial
    • Blog
    • Books
  • RELEASE NOTES
    • 2025
      • April
      • March
      • February
      • January
    • 2024
      • December
      • November
      • October
      • September
Powered by GitBook
On this page
Export as PDF
  1. Metrics

Setting up metrics

Adding KPIs to your customer journeys makes deriving actionable insights much clearer and easier.

PreviousCreate a comparison metricNextPlanning item overview

Last updated 6 months ago

Two ways to create a new metric

  1. From a journey map: Add a new metric directly within your journey map with the metric card.
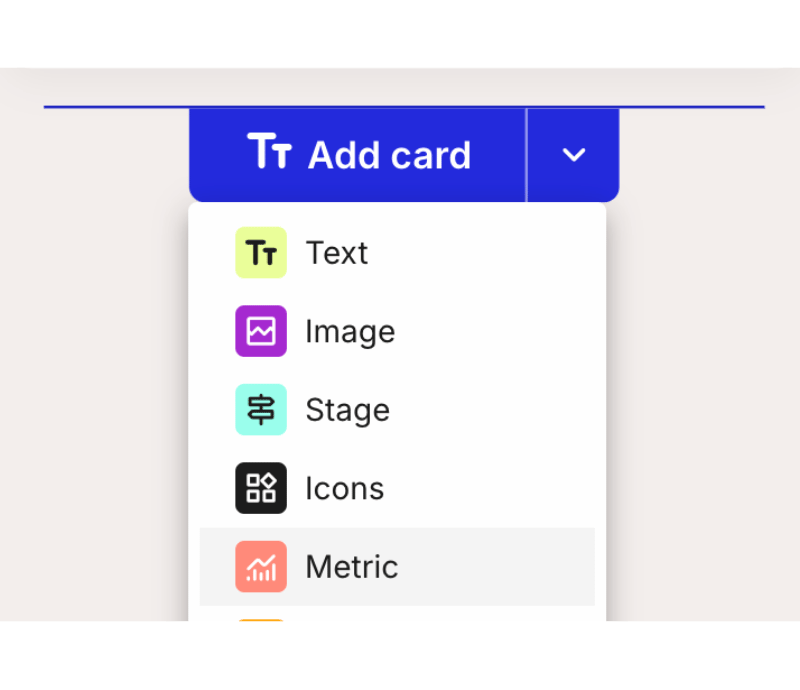
  1. From the metrics page: Create a new metric from the metrics page on your workspace dashboard.

In both cases, the metric will be available across your entire account. Any changes made to the metric (e.g. adding or editing values) will be reflected in all its instances throughout all workspaces in the account.

  1. Enter details for your metric

  • Add a title

  • Select the data source: For now, we offer manual data entries including CSV uploads

  • Choose a type:some text

    • Series: Track values over time, such as monthly sign-ups or user growth

    • Number: Specify targets or milestones, like sales targets or goal completions

    • Comparison: Compare two values, such as this month’s performance versus last month’s, or projected versus actual results.

  1. Preview and set default display settings

  • View a preview of how the metric will look on a card in your journey map.
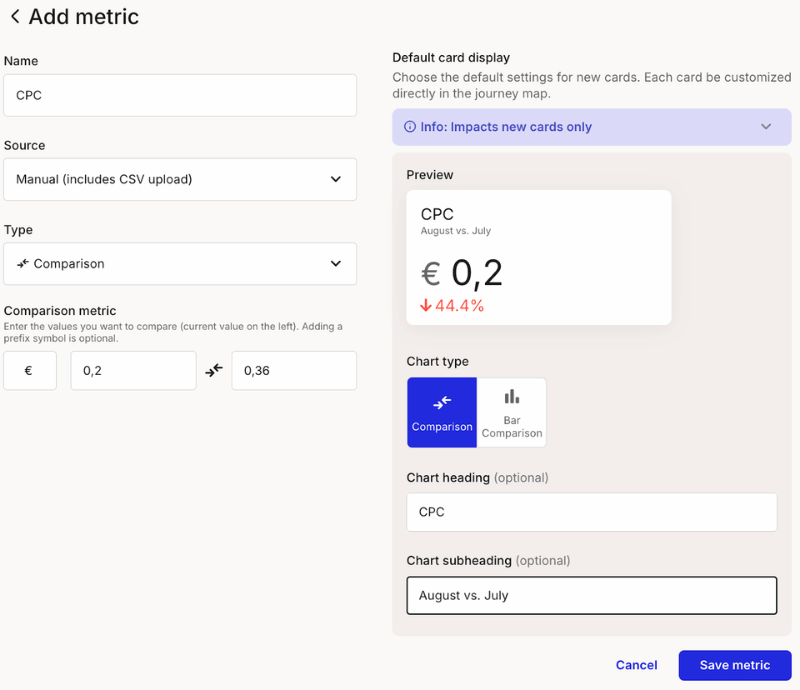
  • These default settings will apply to all cards of this metric but can be customized per card on the journey map. There you can adjust the heading, subheading, or chart type as needed.

  1. Save and add to your journey map

  • Save your metric and then add it to your journey map by selecting it from the dropdown menu in the metric card.

Availability:

This feature is available for all plans, but limited to 5 metrics (tbc) on the free plan. Enterprise plans can set up an unlimited amount of metrics.

when adding a card, a drop down opens where you can choose from various card types.